> ## Documentation Index
> Fetch the complete documentation index at: https://guides.heyallset.com/llms.txt
> Use this file to discover all available pages before exploring further.

# How to Set Up API Key, Pin, & Tokenization

> Learn how to create an API Key, set up a PIN, and generate a tokenization key for your merchant account in Accept Blue.

## Introduction

Setting up an API Key, PIN, and Tokenization is an essential part of integrating your Accept Blue account. Follow these steps to ensure your merchant account is properly configured for secure transactions.

## Create an API Key and PIN

<Steps>
  <Step title="Step 1">
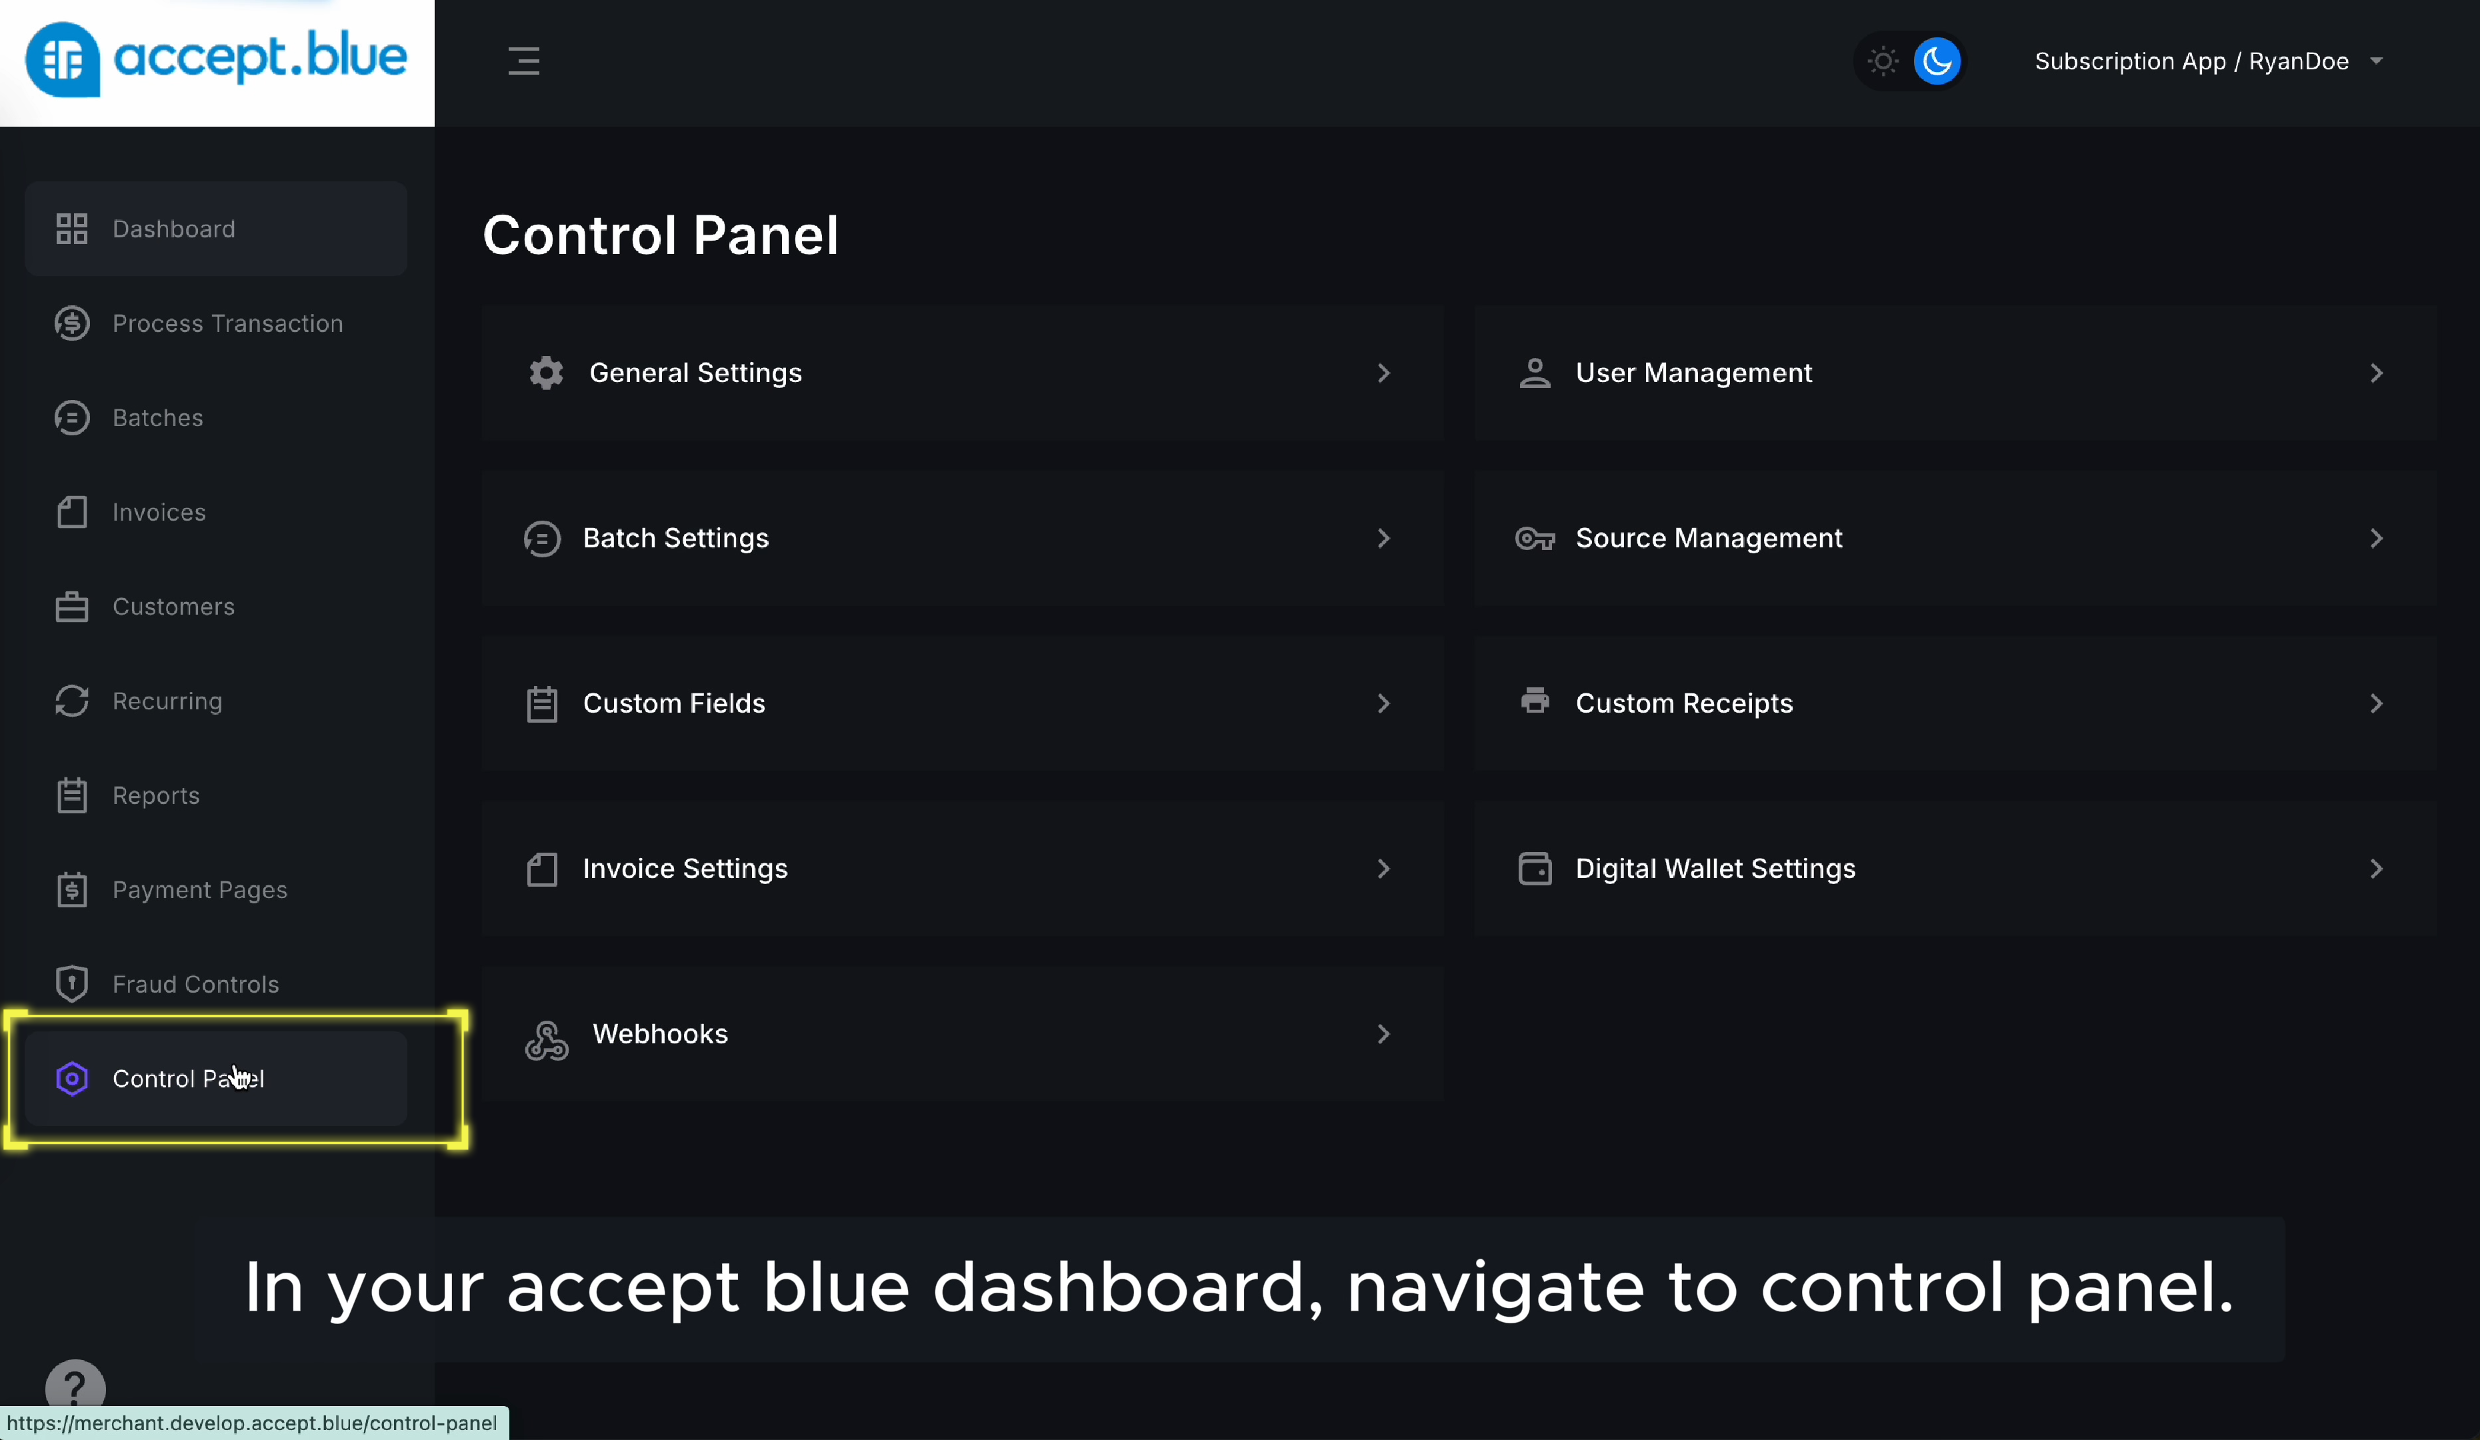
    ## Navigate to Control Panel

    Log into your Accept Blue Dashboard, then go to the left-hand menu and click Control Panel.
    <img src="https://mintcdn.com/allset-4aec8bc0/0jKEgzGspG6HGCv3/images/control-panel.png?fit=max&auto=format&n=0jKEgzGspG6HGCv3&q=85&s=13d18638ef16a304129681095a5b873e" alt="Control Panel Pn" width="2480" height="1440" data-path="images/control-panel.png" />
  </Step>

  <Step title="Step 2">
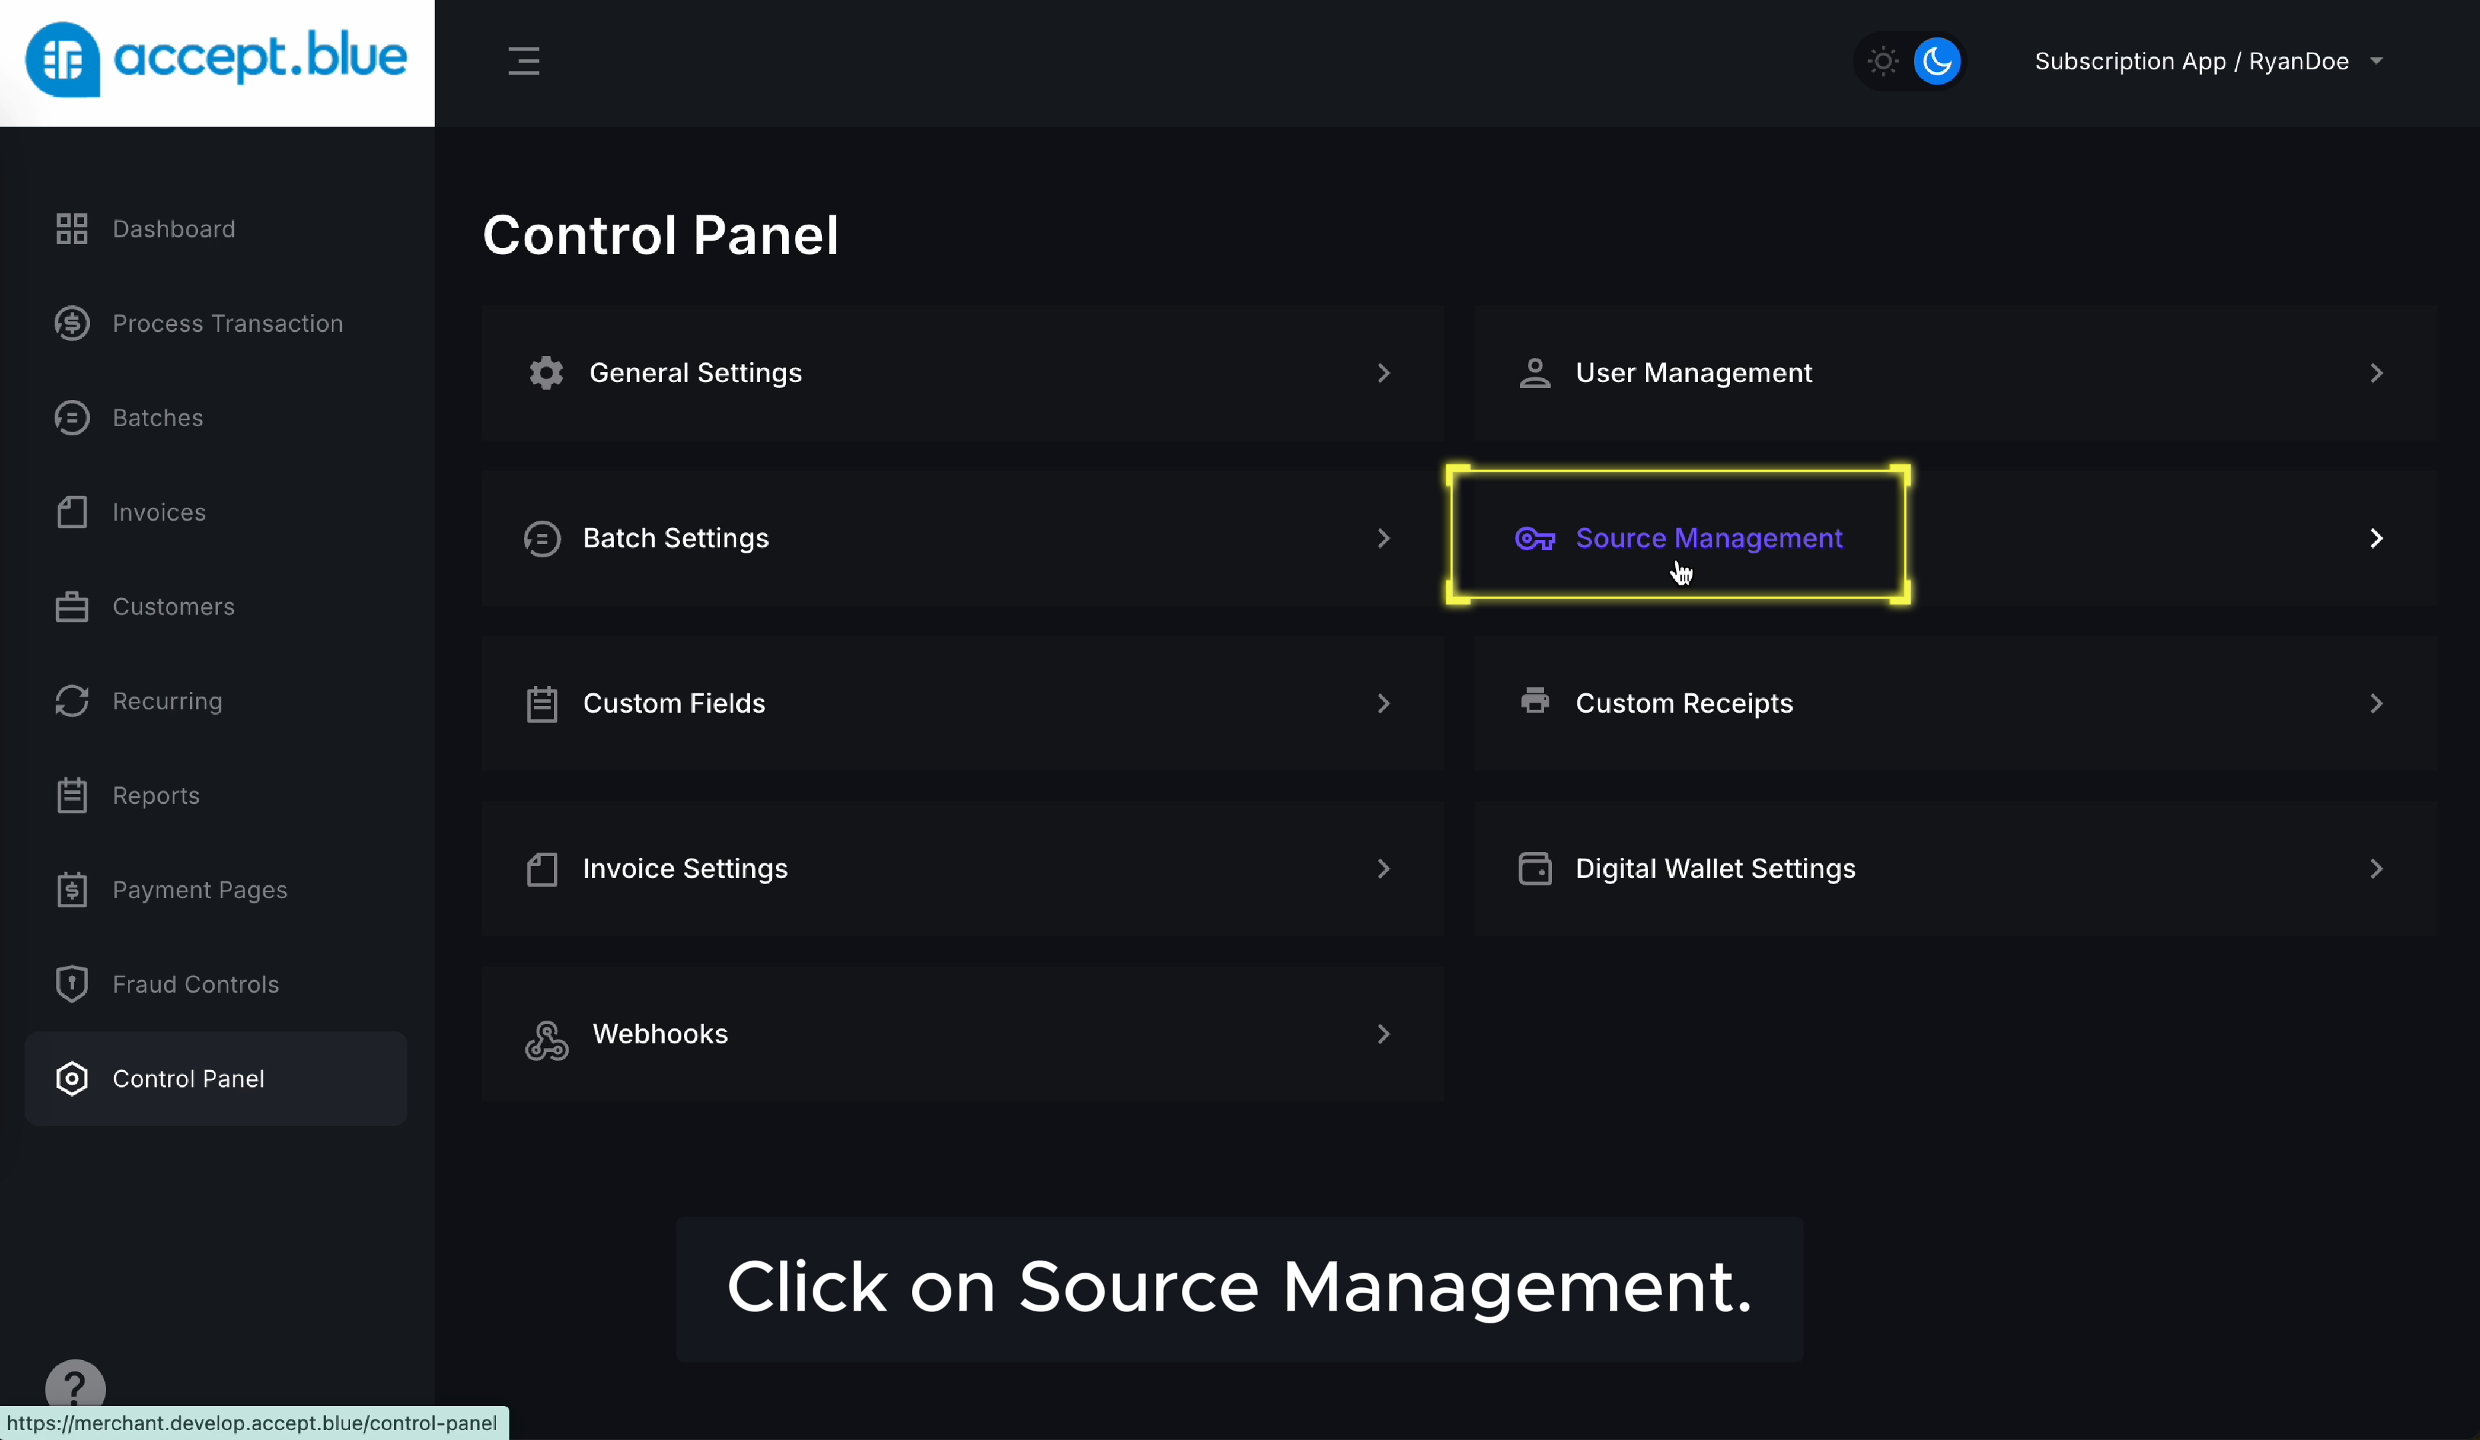
    ## Click on Source Management

    Inside the Control Panel, select Source Management to manage your API and token keys.
    <img src="https://mintcdn.com/allset-4aec8bc0/fT23JsCqtNJF17Wp/images/source-management.png?fit=max&auto=format&n=fT23JsCqtNJF17Wp&q=85&s=6a97ddc86e432a919ccb00a242ff5f1b" alt="Source Management Pn" width="2480" height="1440" data-path="images/source-management.png" />
  </Step>

  <Step title="Step 3">
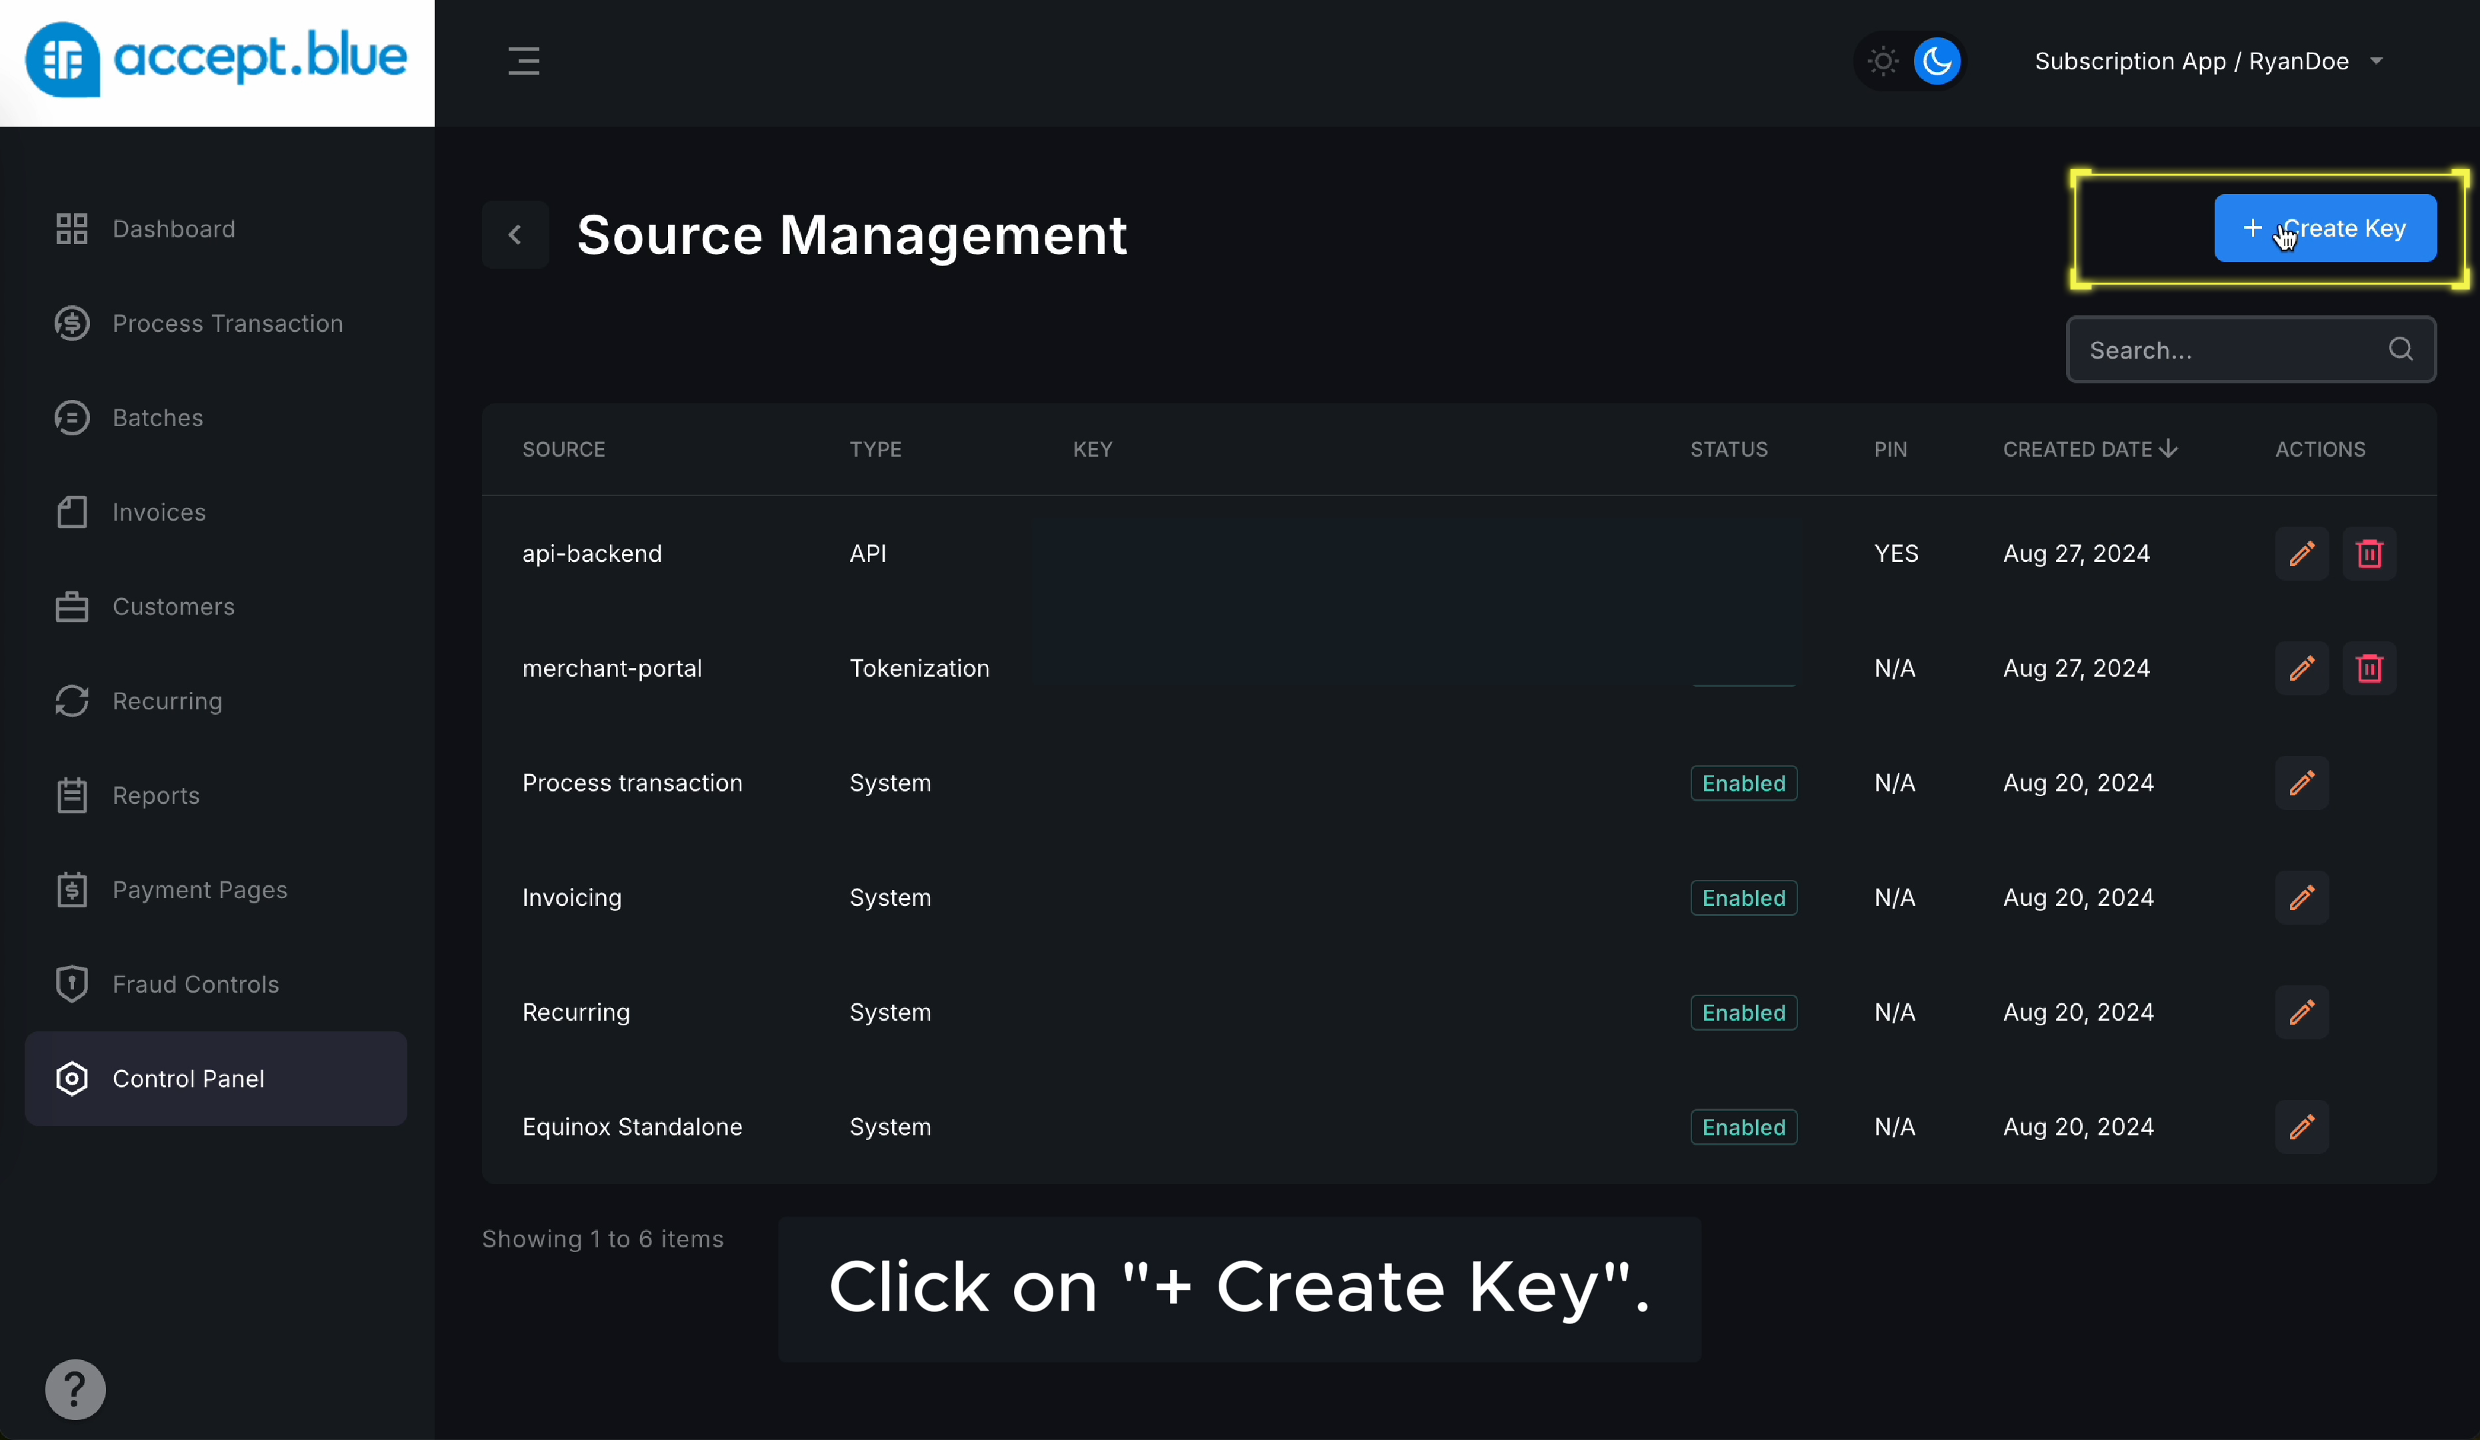
    ## Click “+ Create Key”

    Click the + Create Key button to begin setting up a new API key.
    <img src="https://mintcdn.com/allset-4aec8bc0/0jKEgzGspG6HGCv3/images/create-key.png?fit=max&auto=format&n=0jKEgzGspG6HGCv3&q=85&s=0cbded0aba734e27d6e1533a5484021b" alt="Create Key Pn" width="2480" height="1440" data-path="images/create-key.png" />
  </Step>

  <Step title="Step 4">
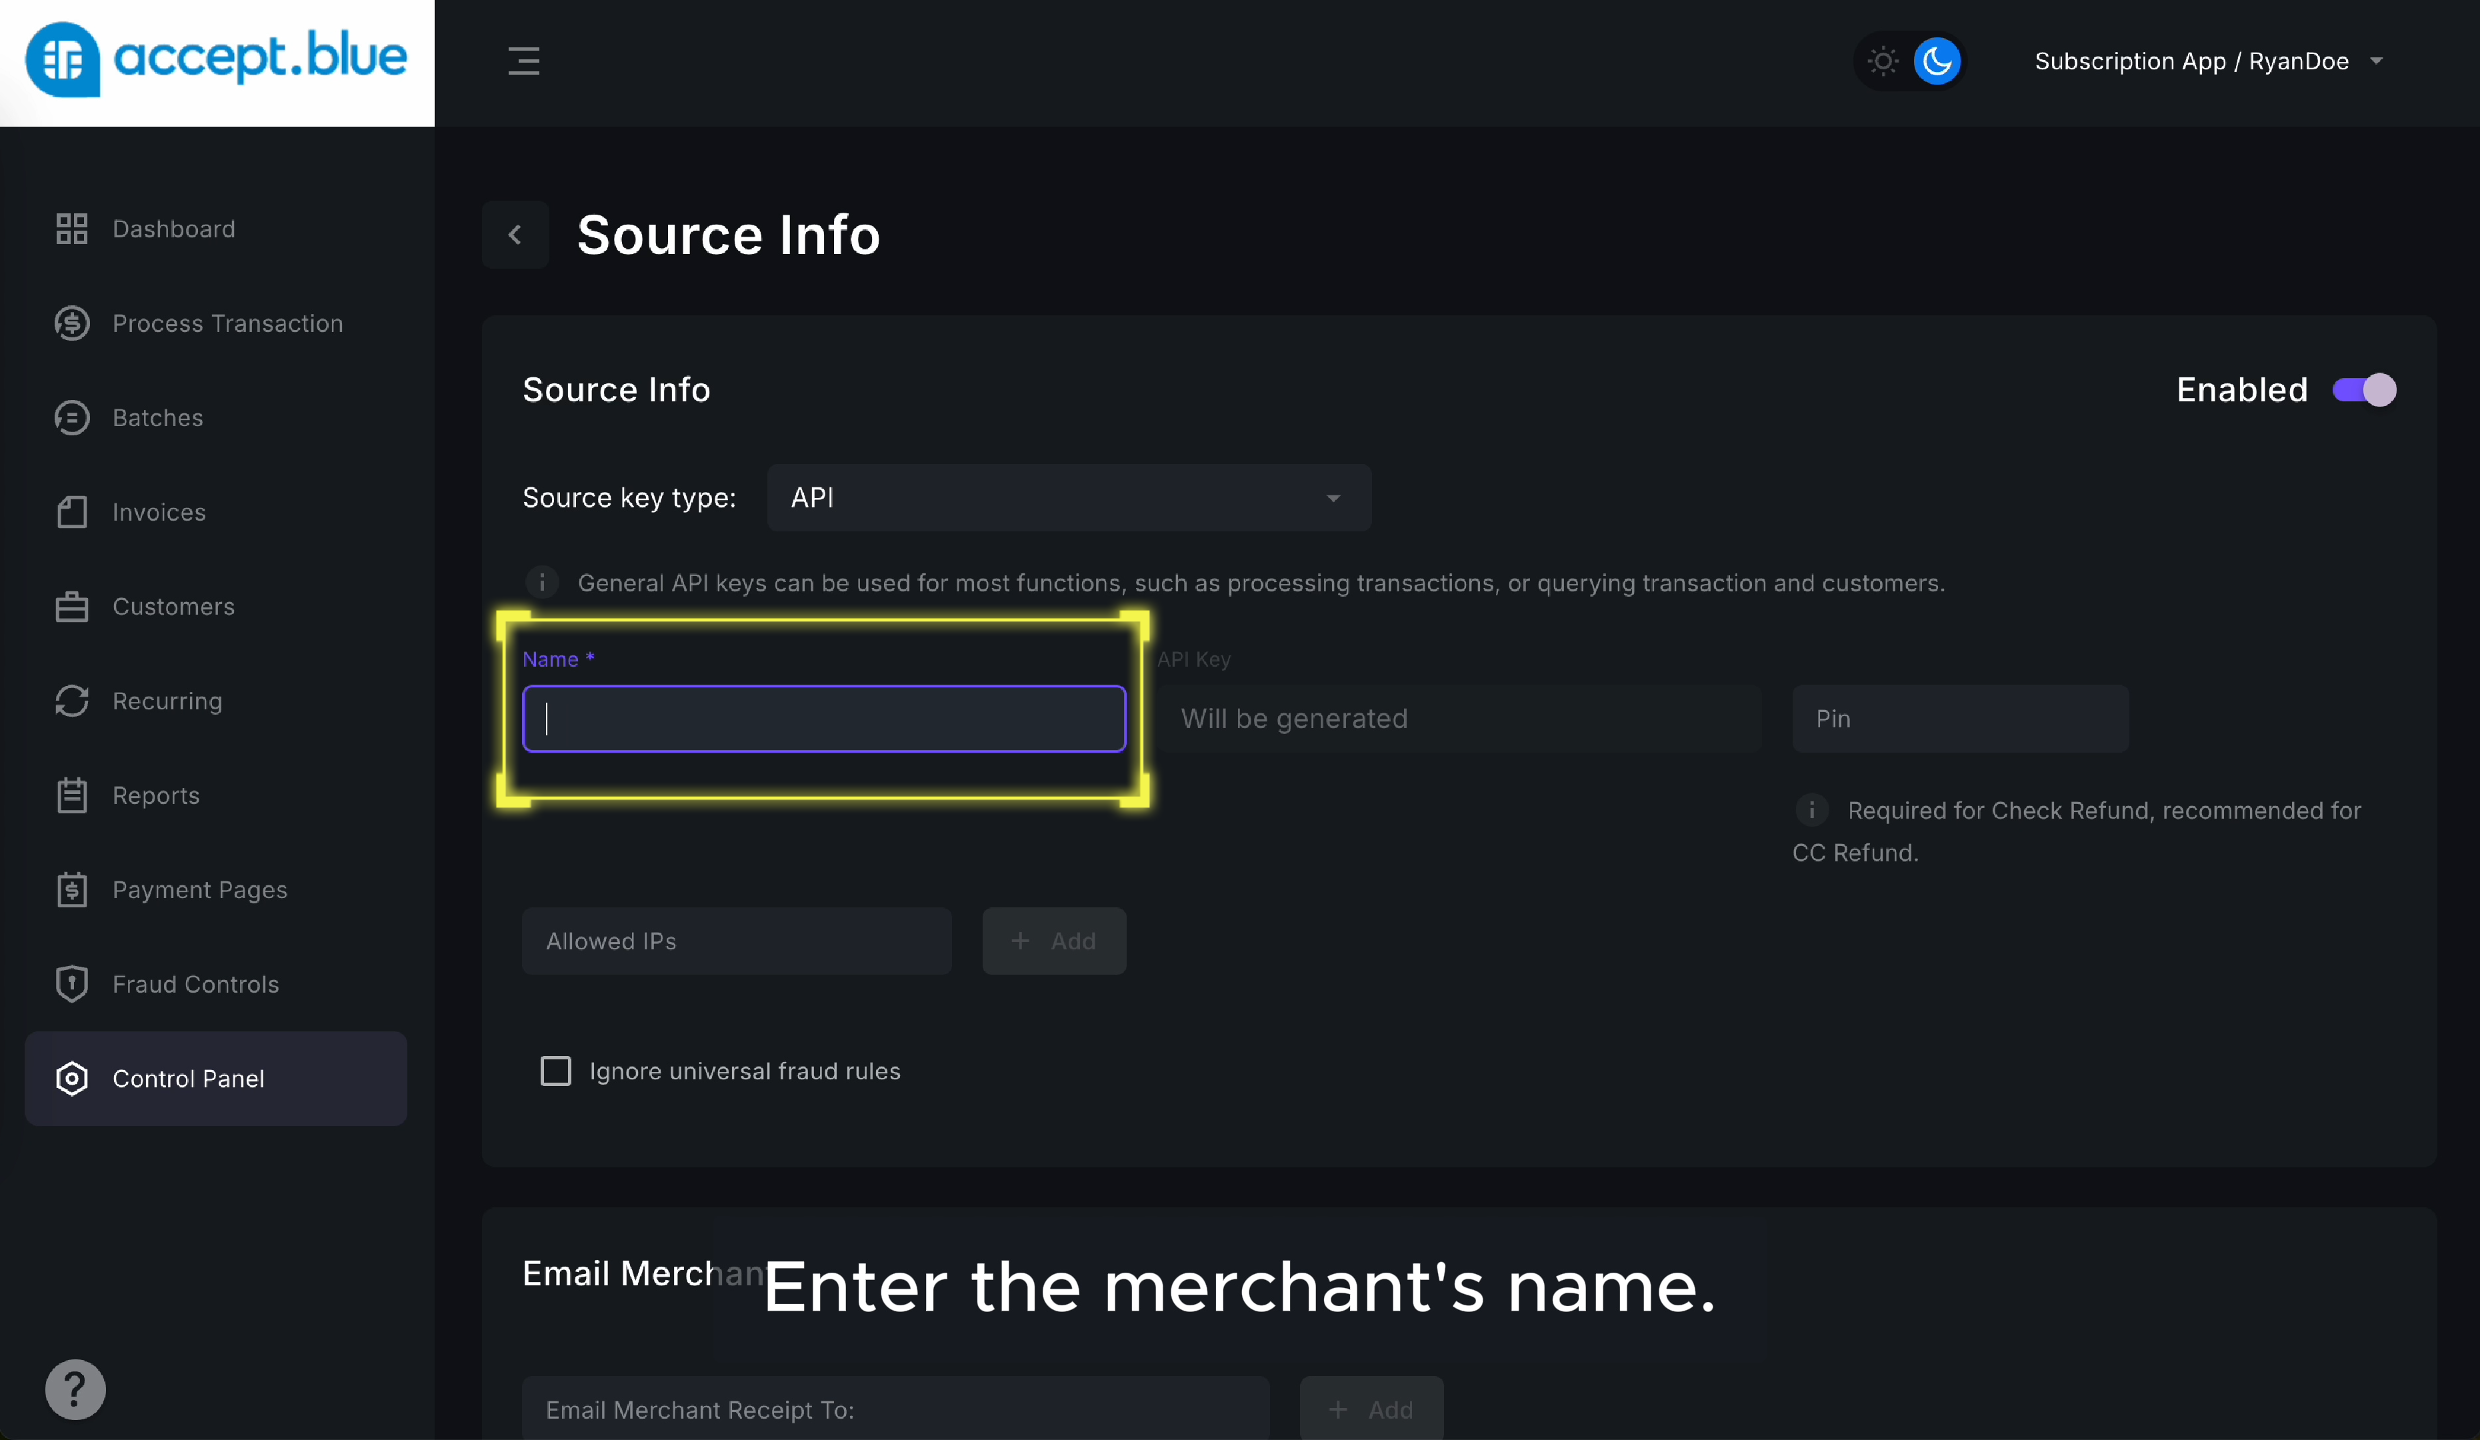
    ## Enter the Merchant’s Name

    Input the merchant's name you'd like to associate with this key.
    <img src="https://mintcdn.com/allset-4aec8bc0/0jKEgzGspG6HGCv3/images/merchant-name.png?fit=max&auto=format&n=0jKEgzGspG6HGCv3&q=85&s=d3c62c247075c636c5f53bbbef01df72" alt="Merchant Name Pn" width="2480" height="1440" data-path="images/merchant-name.png" />
  </Step>

  <Step title="Step 5">
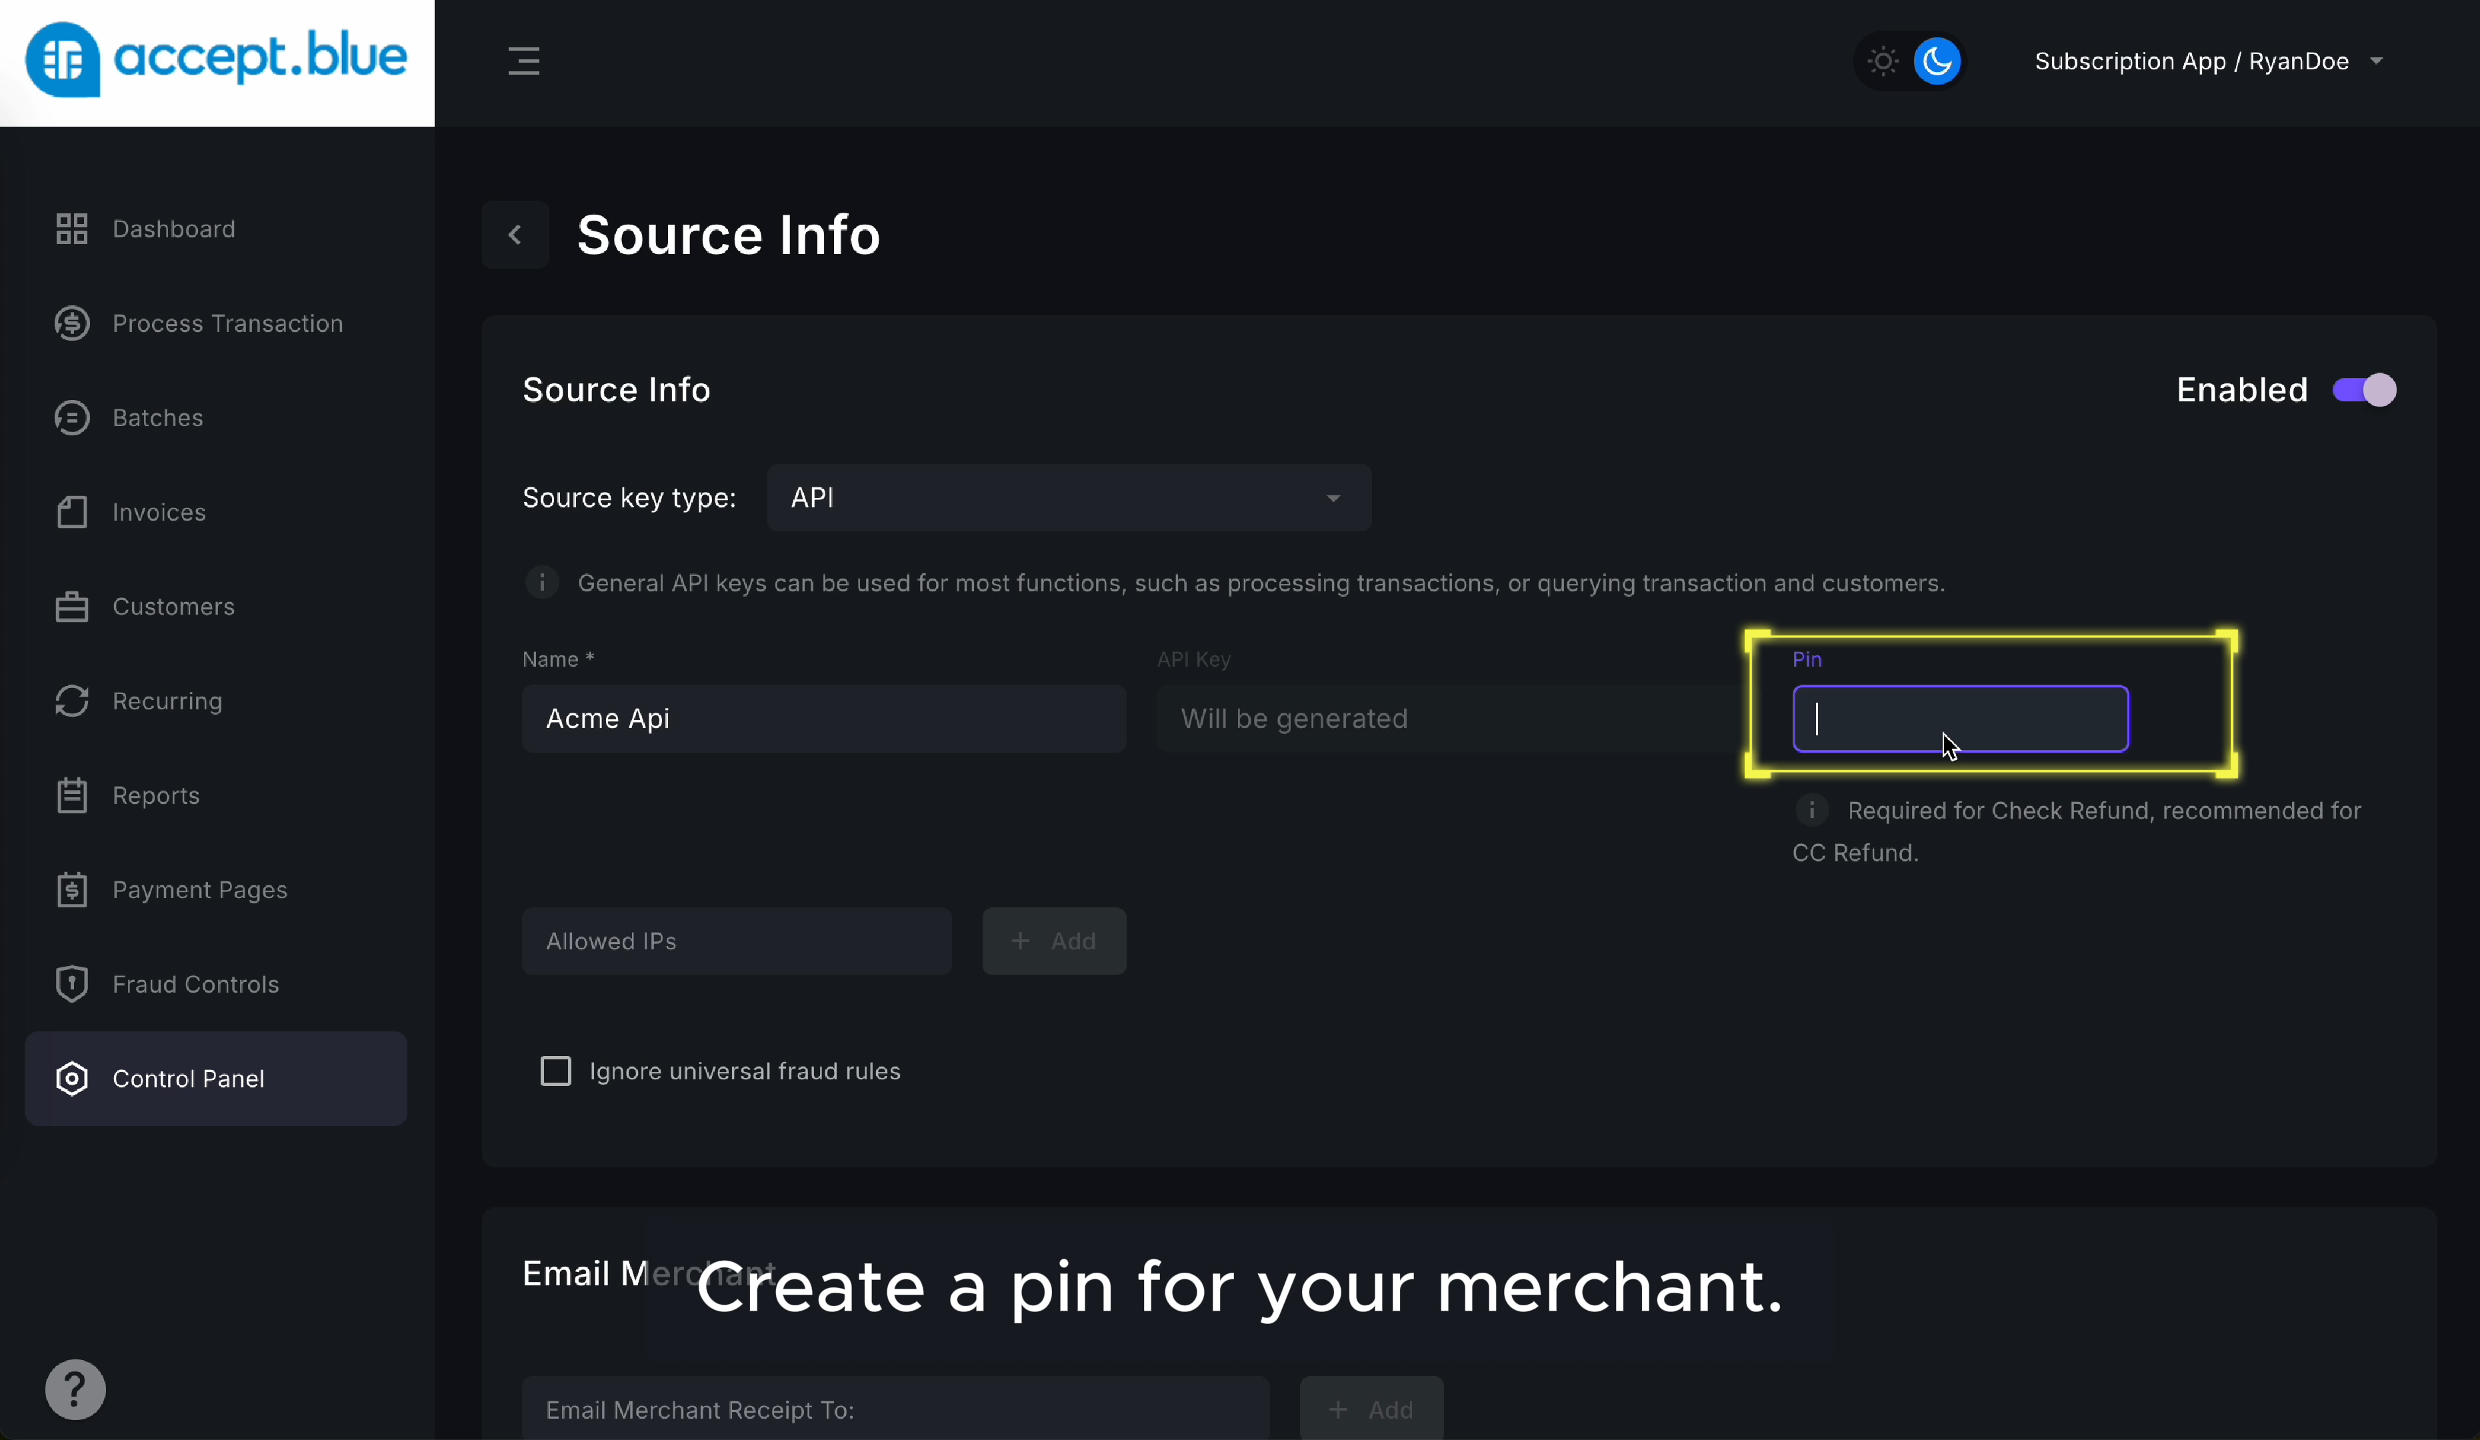
    ## Create a PIN for Your Merchant

    Enter a secure PIN with a minimum of 4 digits.
    <img src="https://mintcdn.com/allset-4aec8bc0/0jKEgzGspG6HGCv3/images/api-pin.png?fit=max&auto=format&n=0jKEgzGspG6HGCv3&q=85&s=b6dc58806b5b144ba12cc165e71fc017" alt="Api Pin Pn" width="2480" height="1440" data-path="images/api-pin.png" />

    <Note>
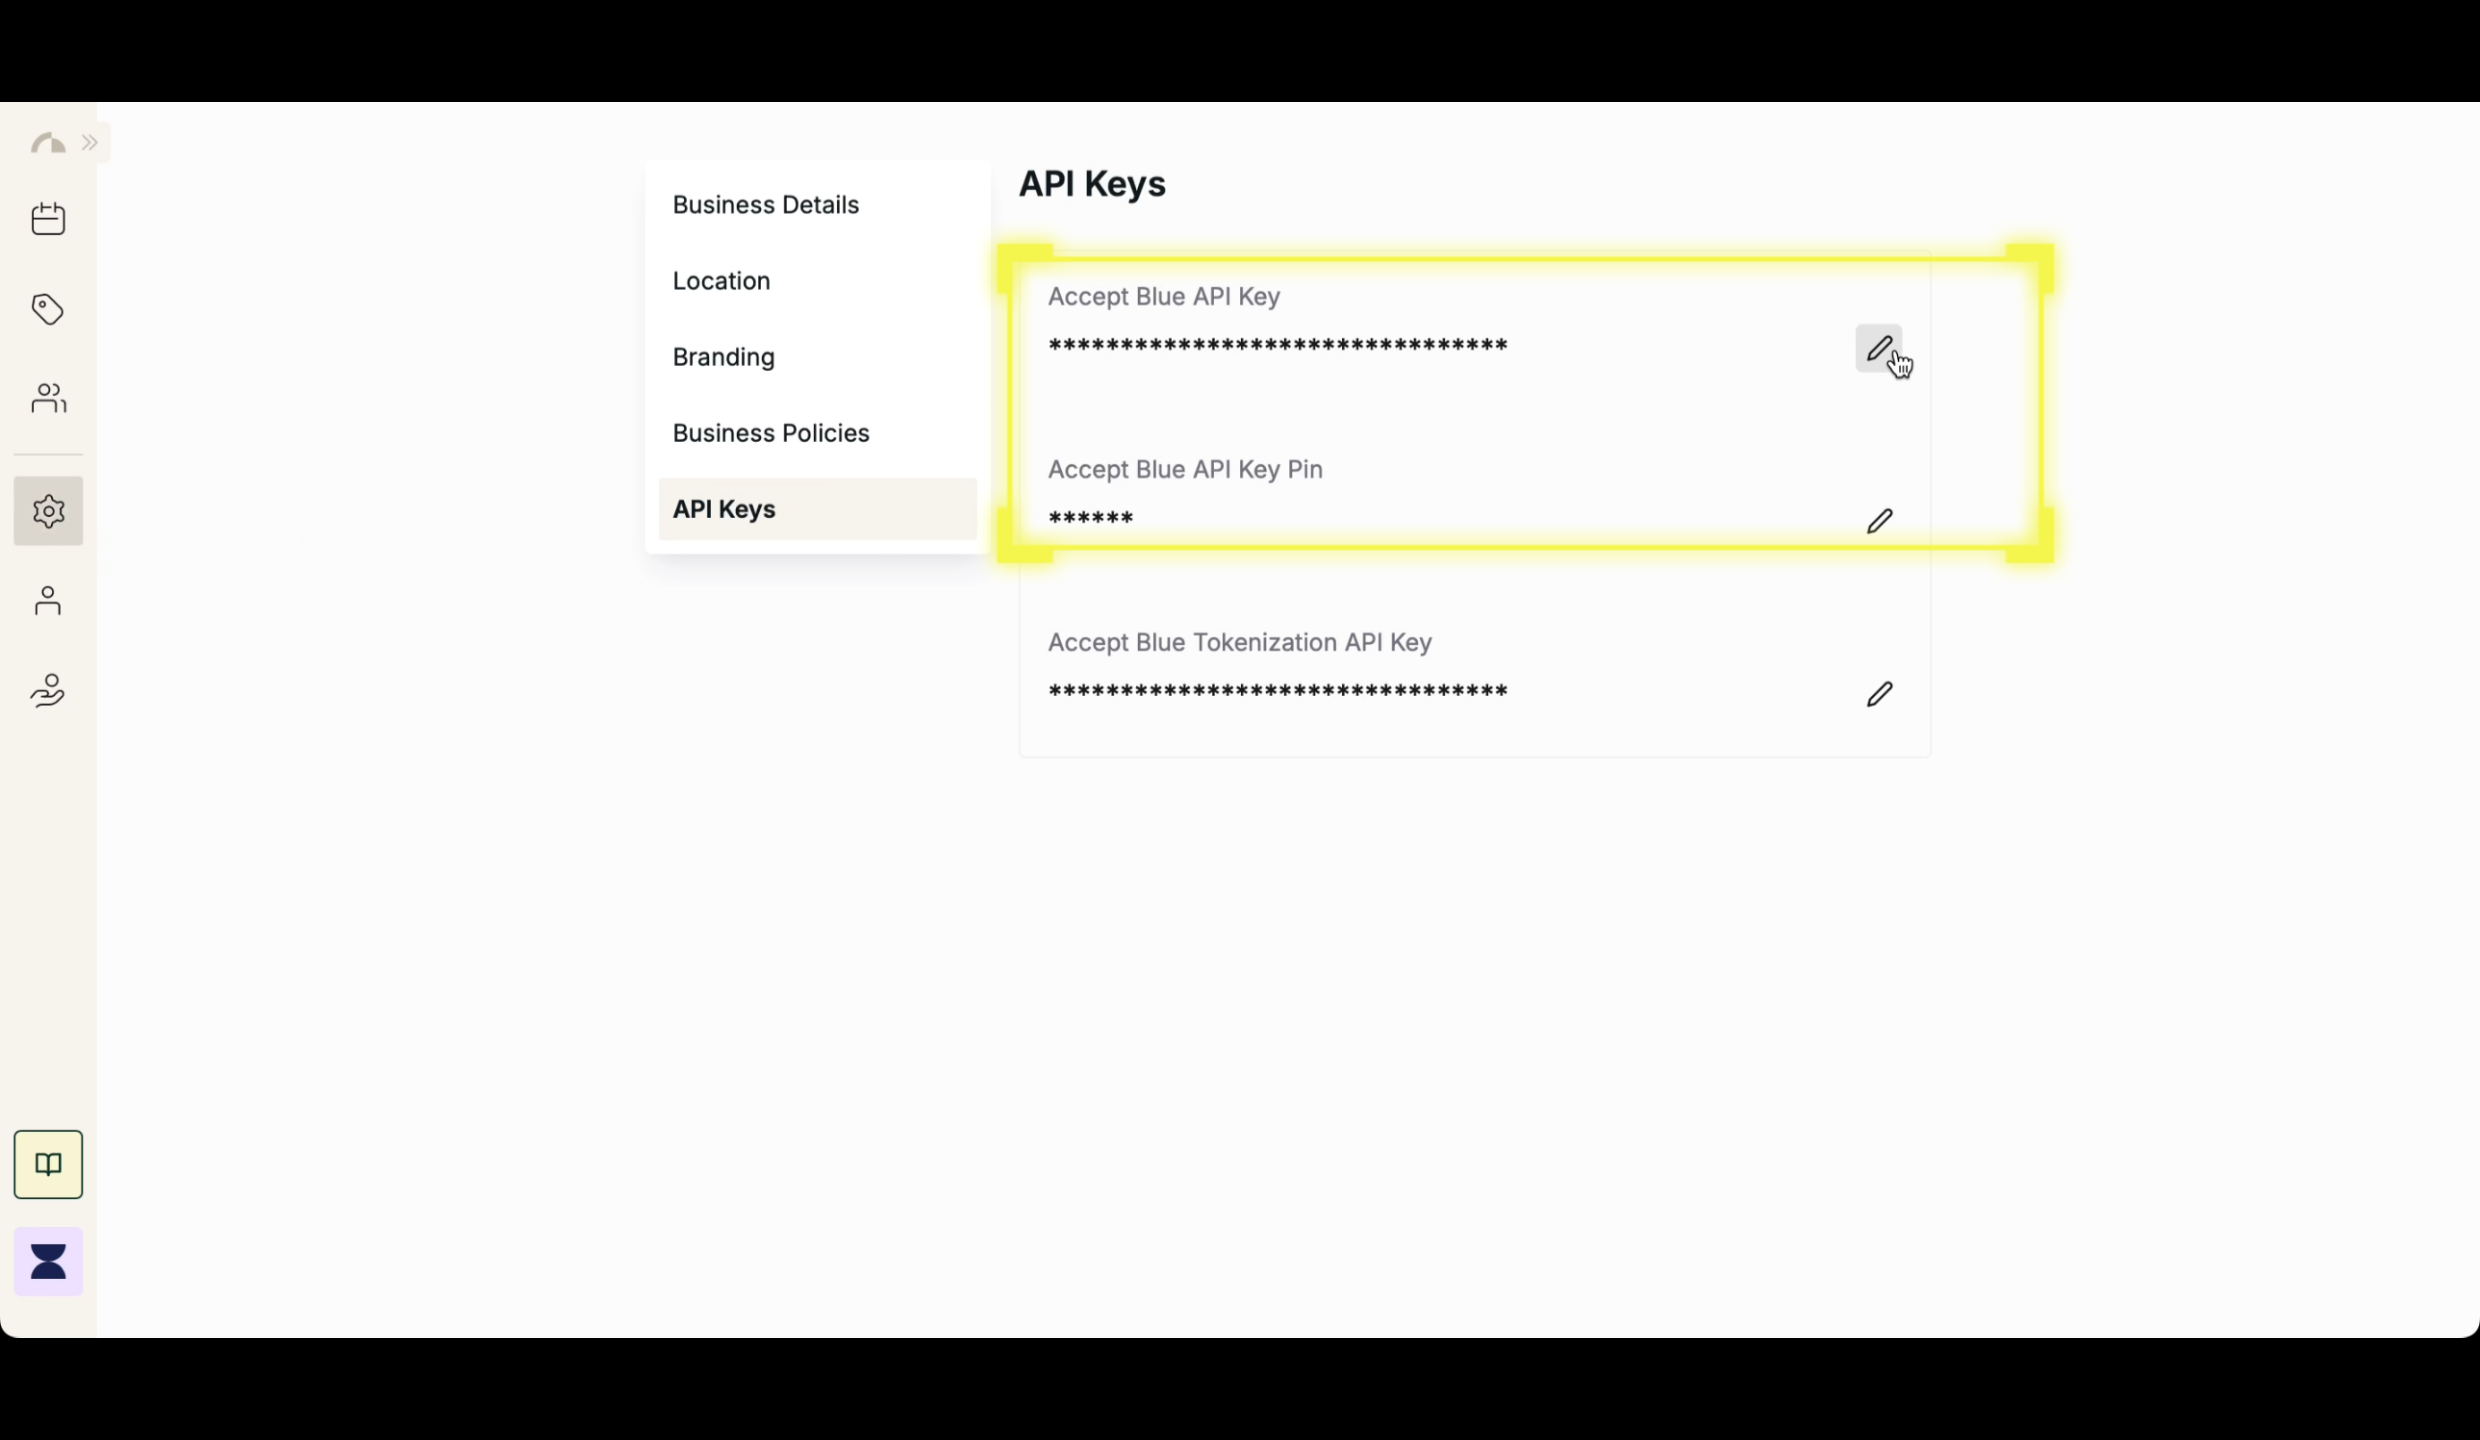
      This PIN will be entered into All Set under Accept Blue API Key PIN.
    </Note>
  </Step>

  <Step title="Step 6">
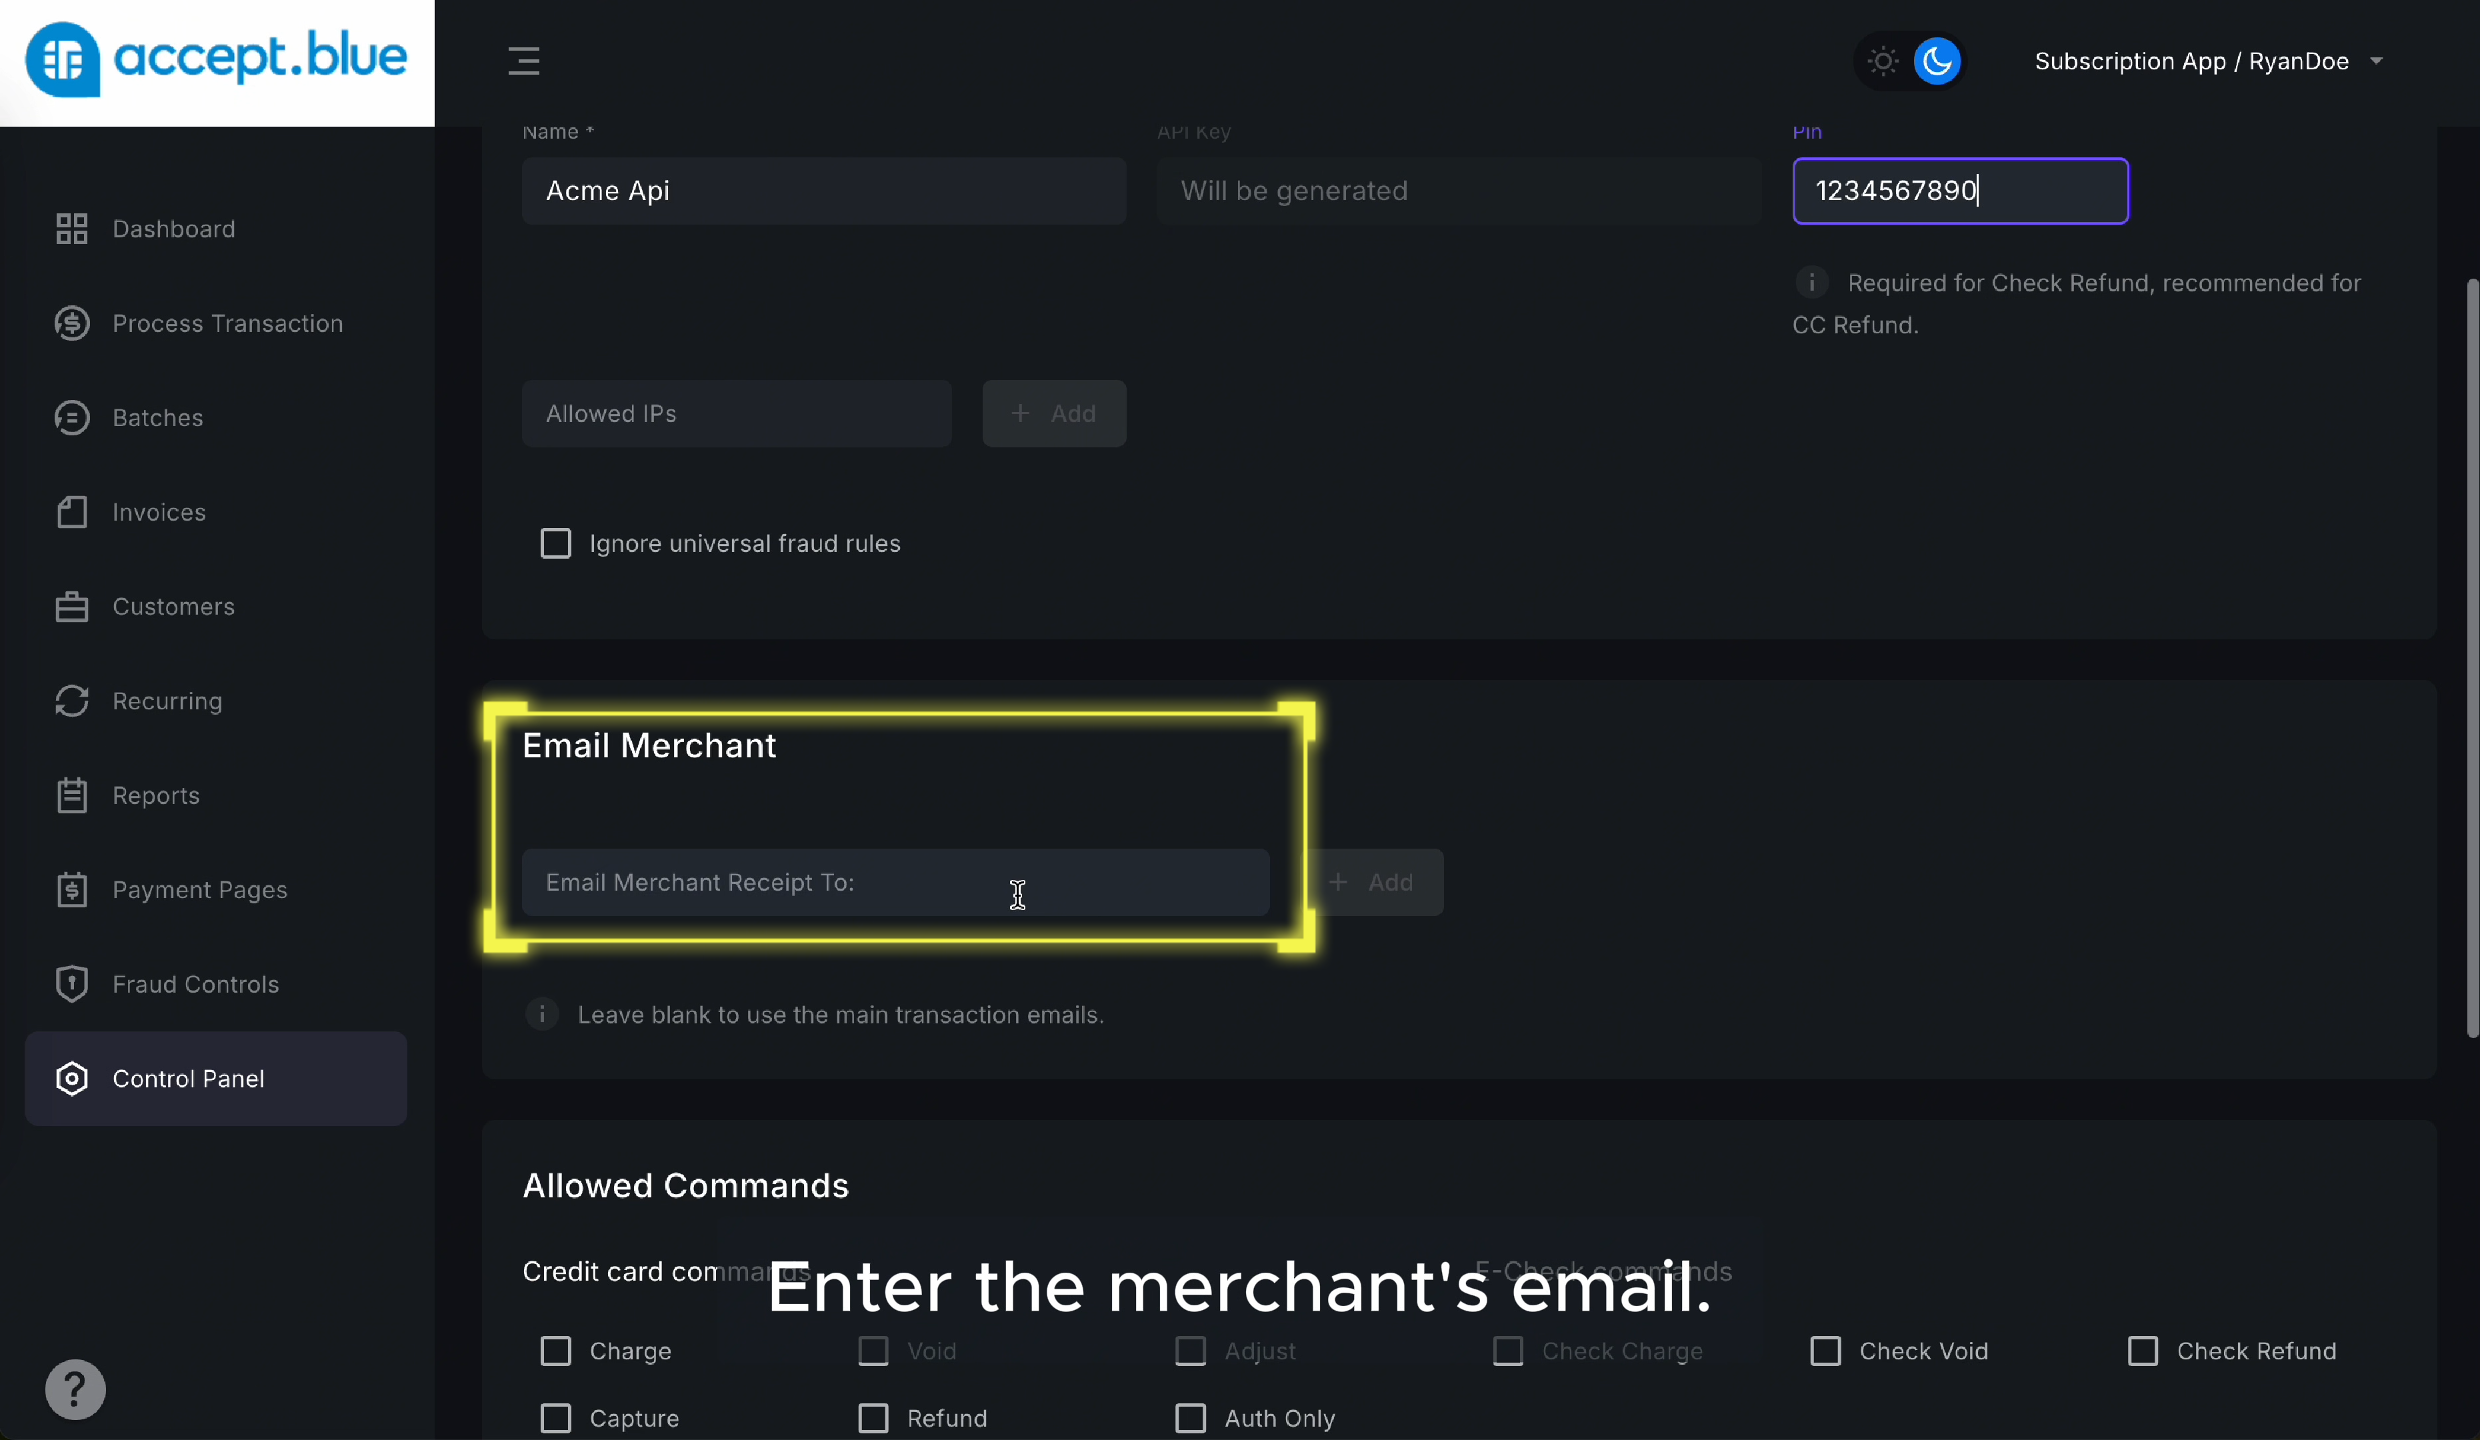
    ## Enter the Merchant’s Email

    Provide the merchant's contact email.
    <img src="https://mintcdn.com/allset-4aec8bc0/0jKEgzGspG6HGCv3/images/merchant-email.png?fit=max&auto=format&n=0jKEgzGspG6HGCv3&q=85&s=2ae3f56a5f88bb8bf359b434c7cf64bc" alt="Merchant Email Pn" width="2480" height="1440" data-path="images/merchant-email.png" />
  </Step>

  <Step title="Step 7">
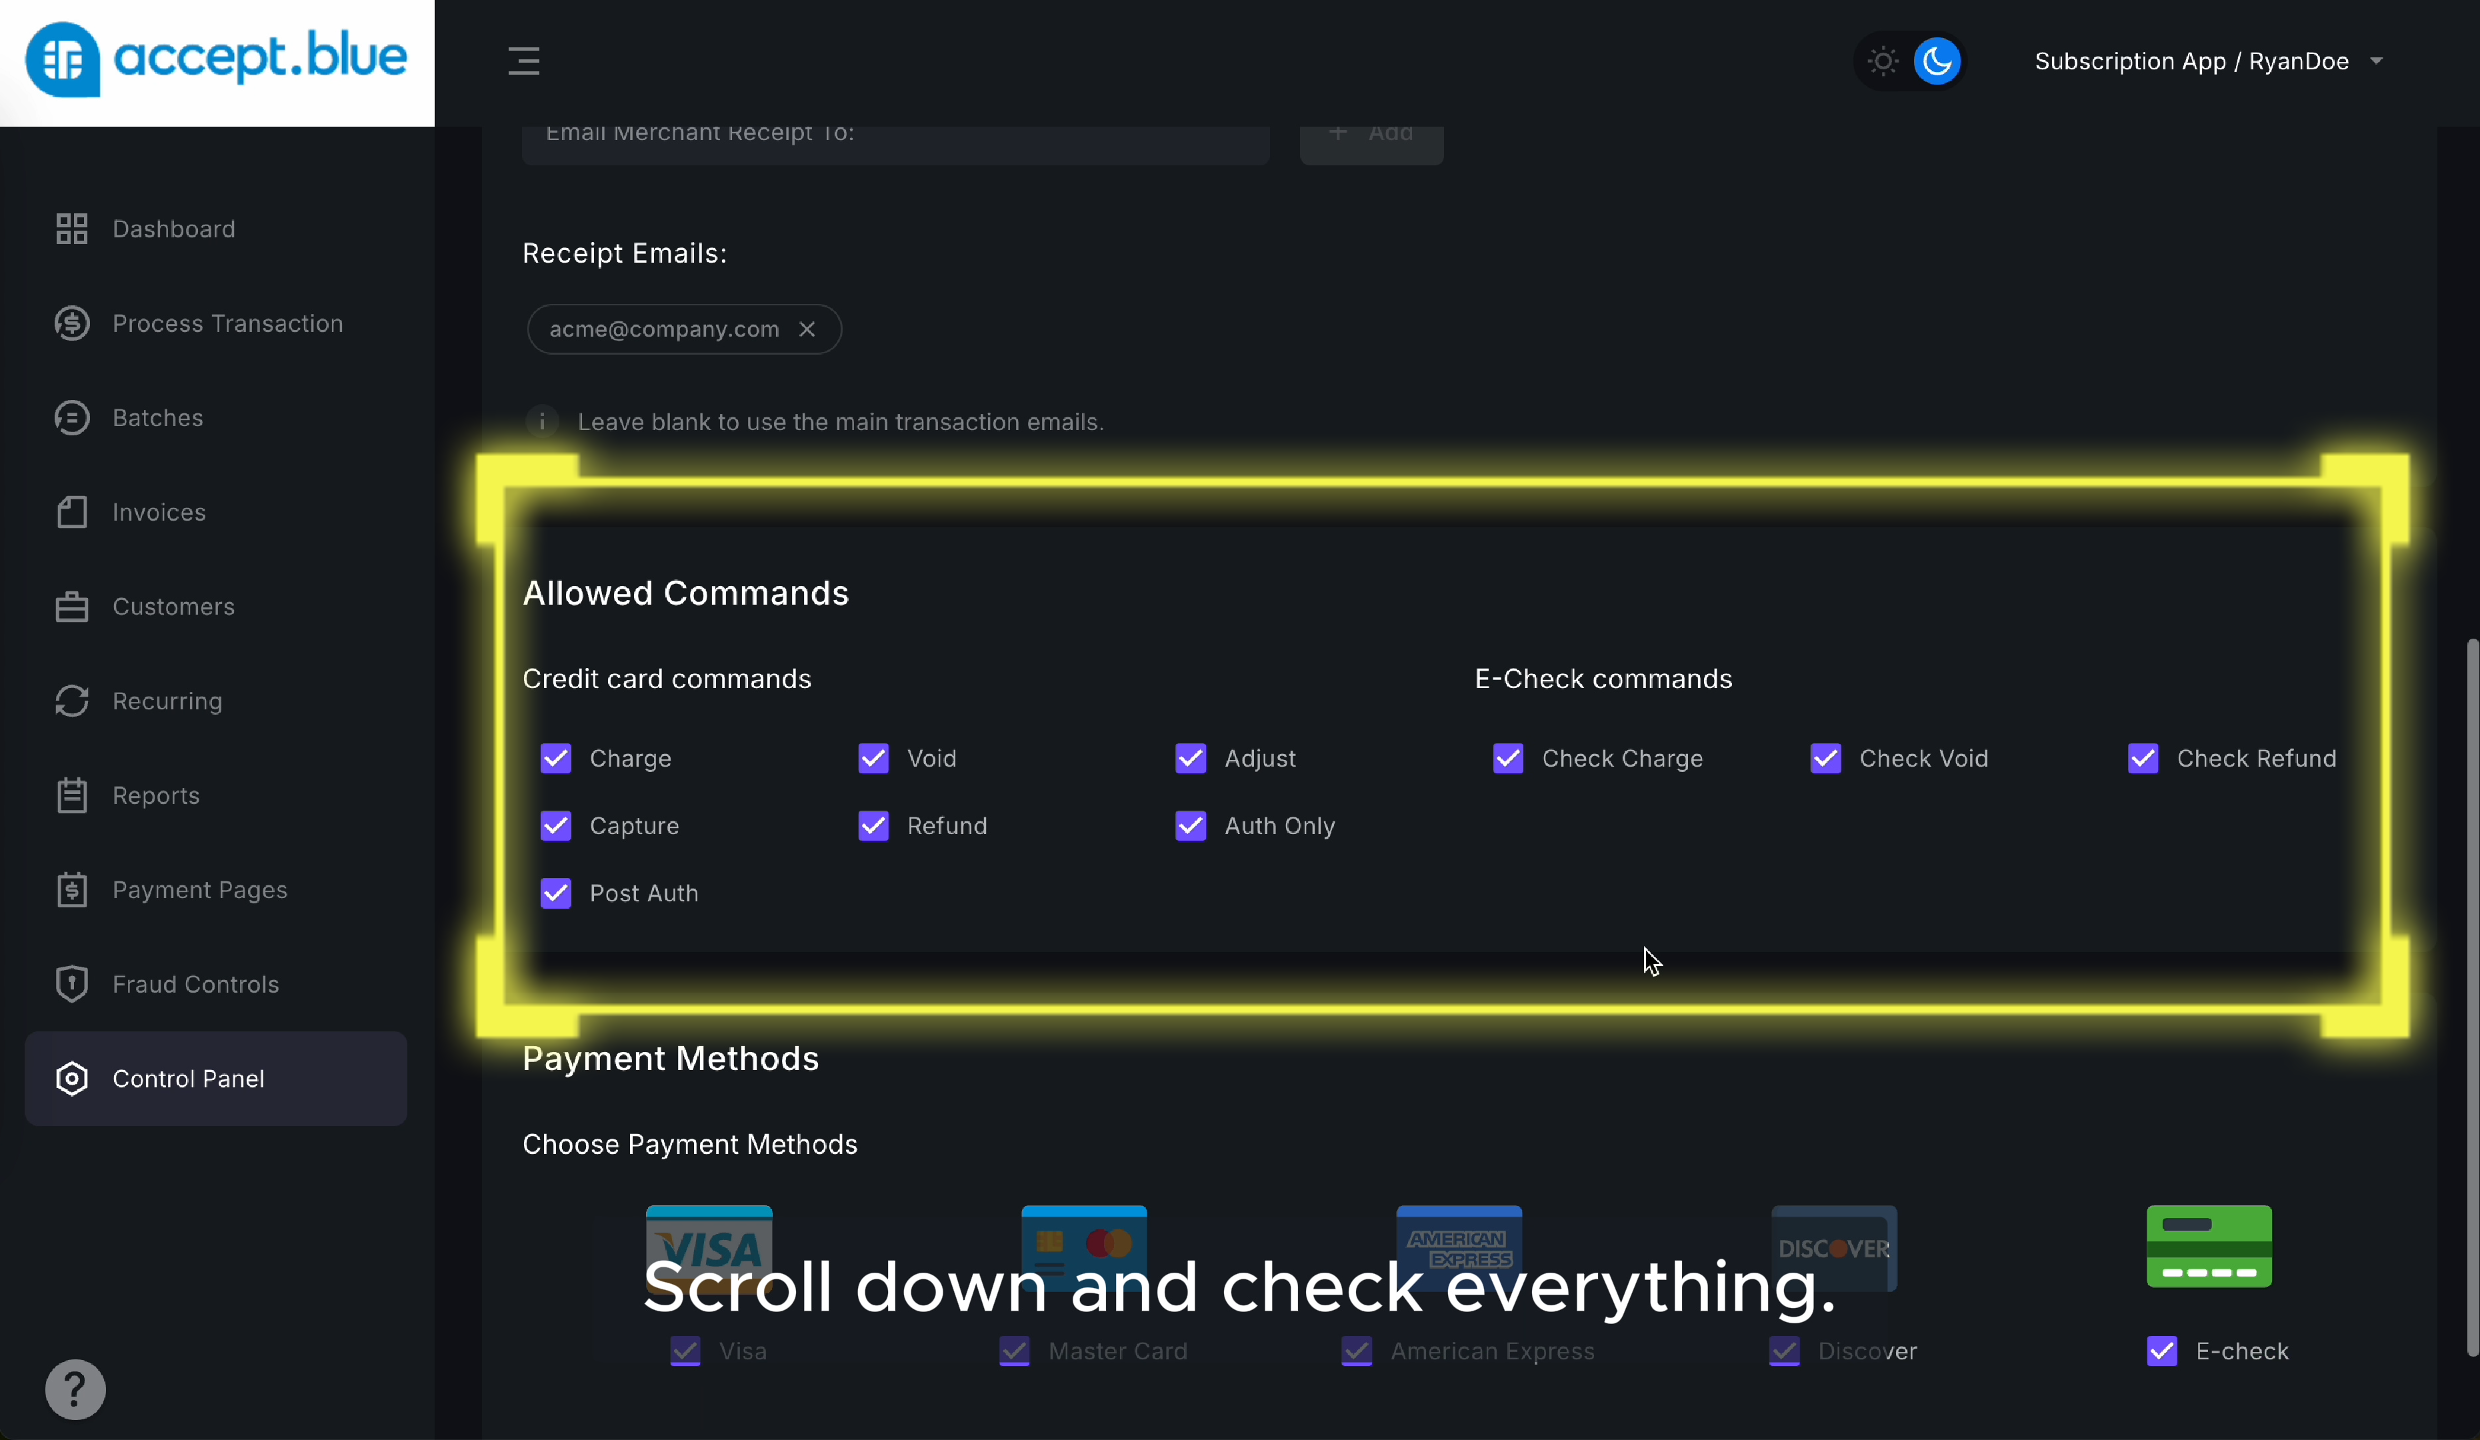
    ## Enable All Commands

    Scroll down and ensure that all command checkboxes are selected.
    <img src="https://mintcdn.com/allset-4aec8bc0/0jKEgzGspG6HGCv3/images/enable-all-commands.png?fit=max&auto=format&n=0jKEgzGspG6HGCv3&q=85&s=e7bd041249c792406fd4b5d28f5b1119" alt="Enable All Commands Pn" width="2480" height="1440" data-path="images/enable-all-commands.png" />
  </Step>

  <Step title="Step 8">
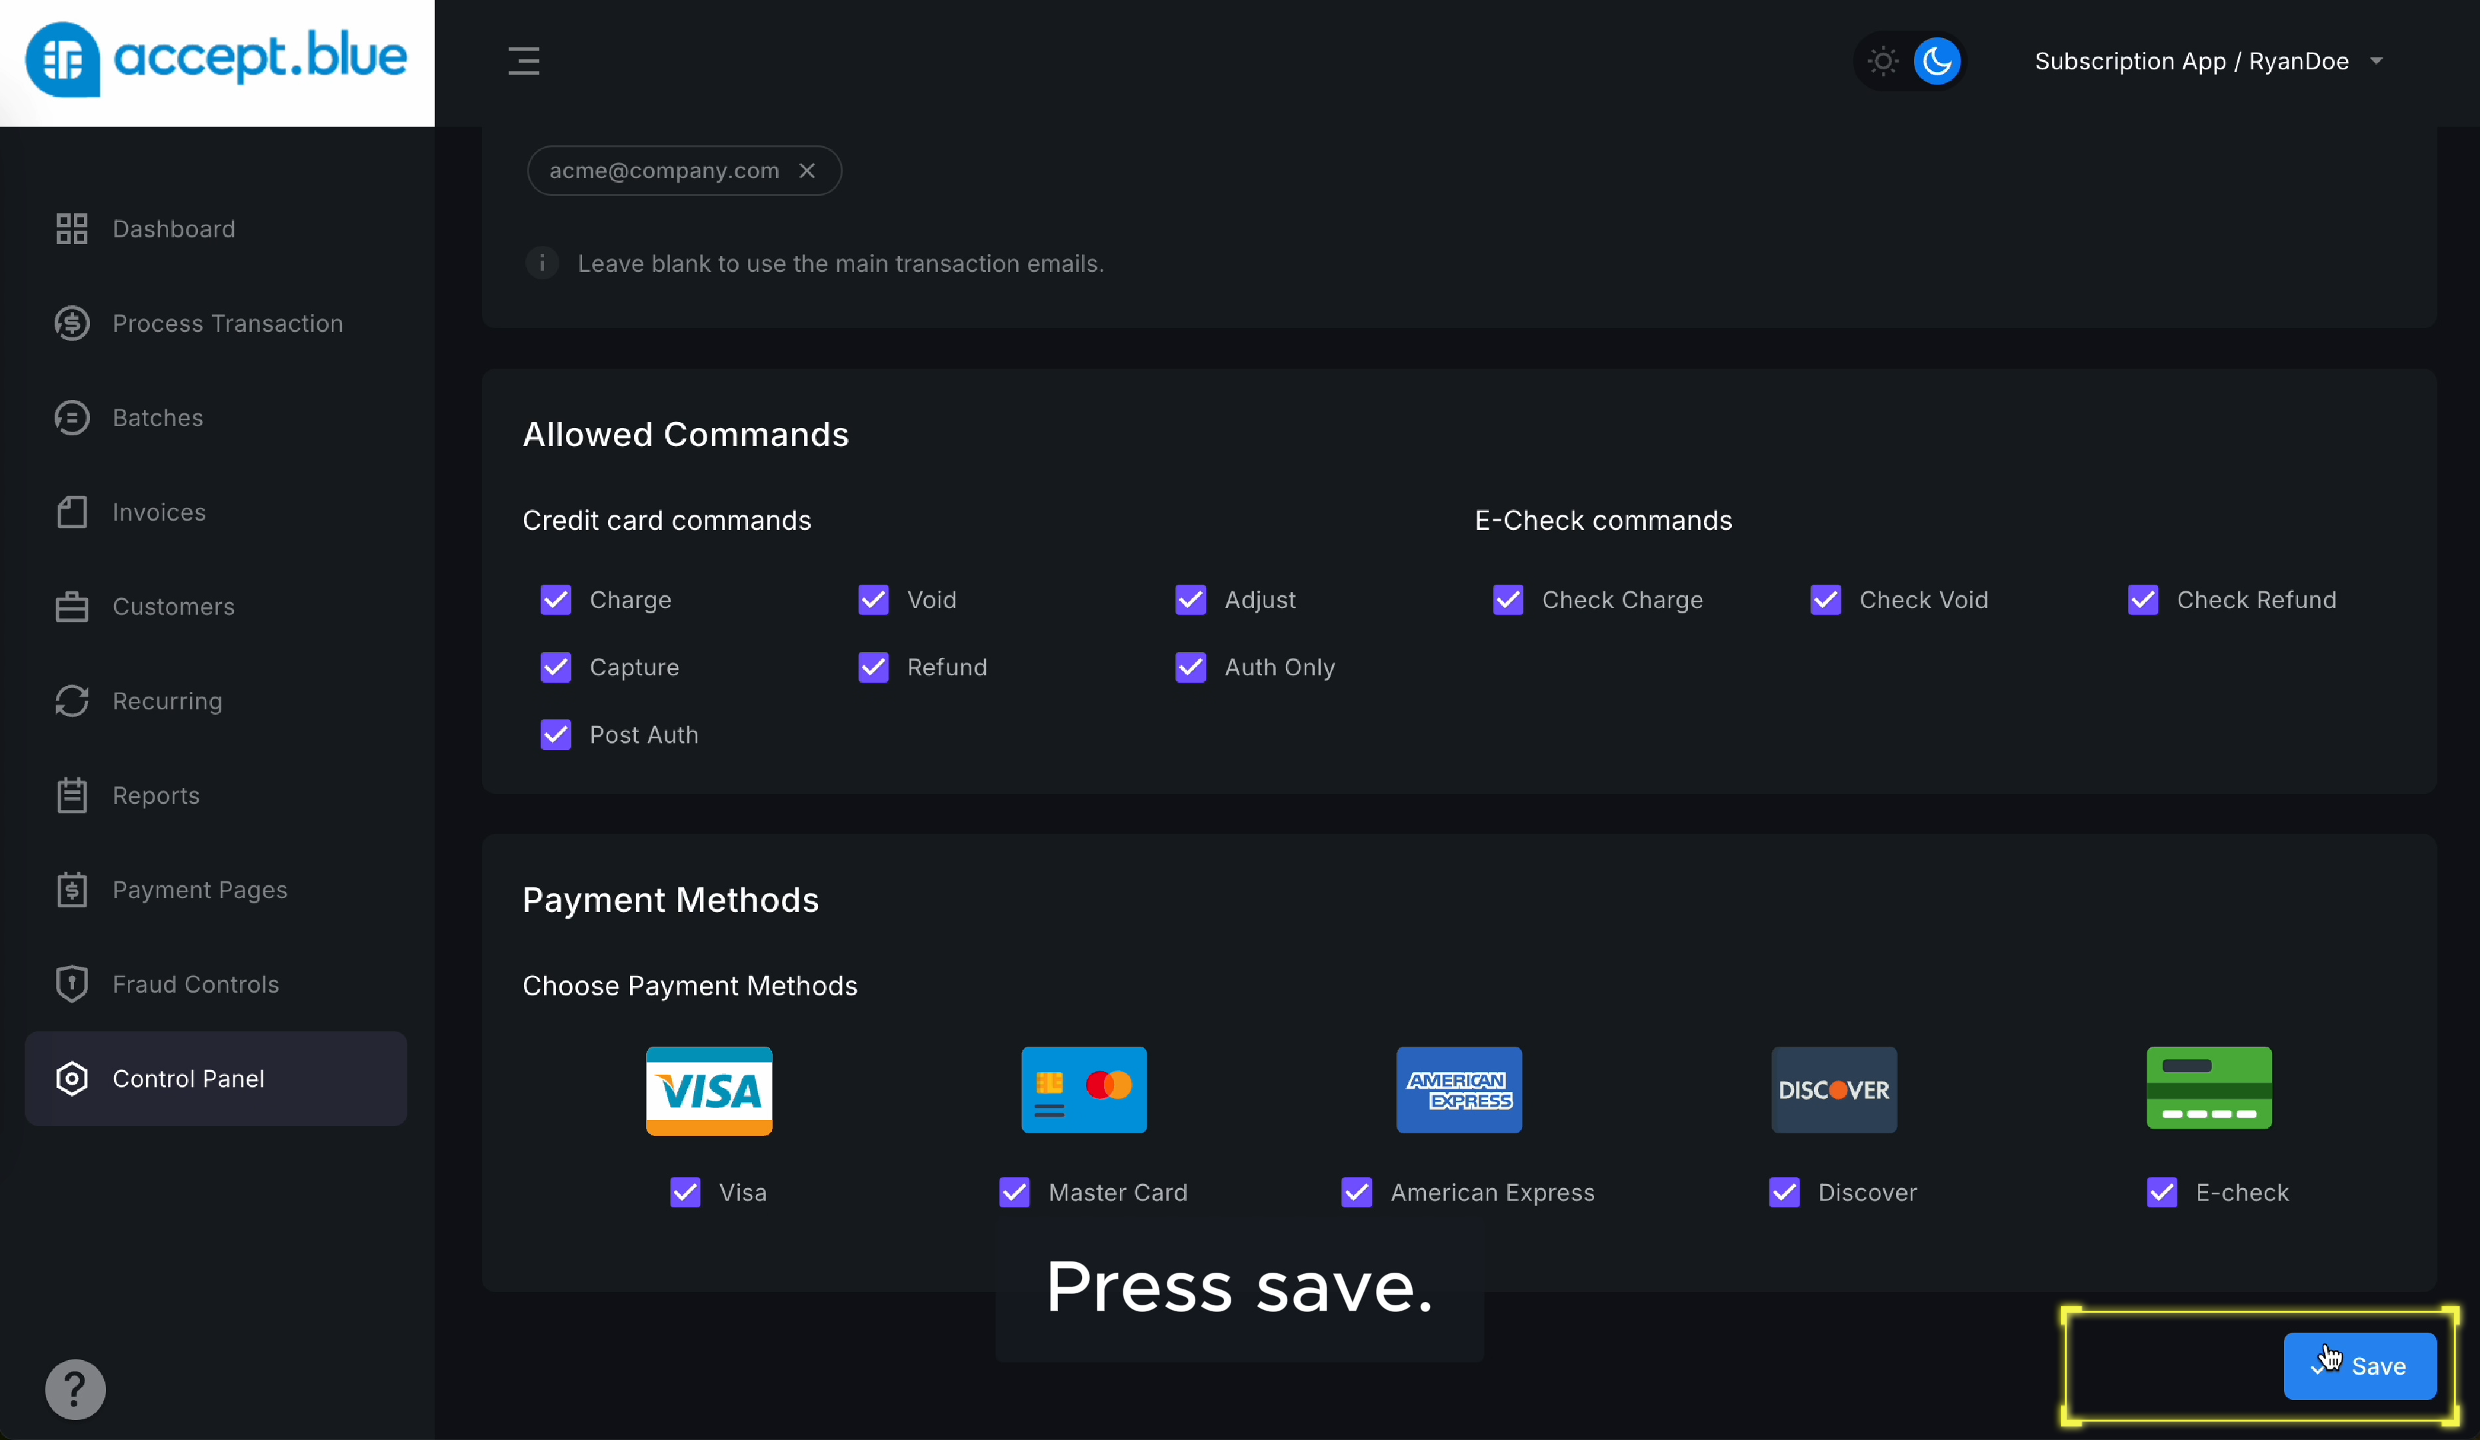
    ## Click “Save” to Generate the API Key

    Click save to confirm and generate your API Key.
    <img src="https://mintcdn.com/allset-4aec8bc0/0jKEgzGspG6HGCv3/images/click-save.png?fit=max&auto=format&n=0jKEgzGspG6HGCv3&q=85&s=3c6628b6786cddd439c6801152dcef4d" alt="Click Save Pn" width="2480" height="1440" data-path="images/click-save.png" />
  </Step>

  <Step title="Step 9">
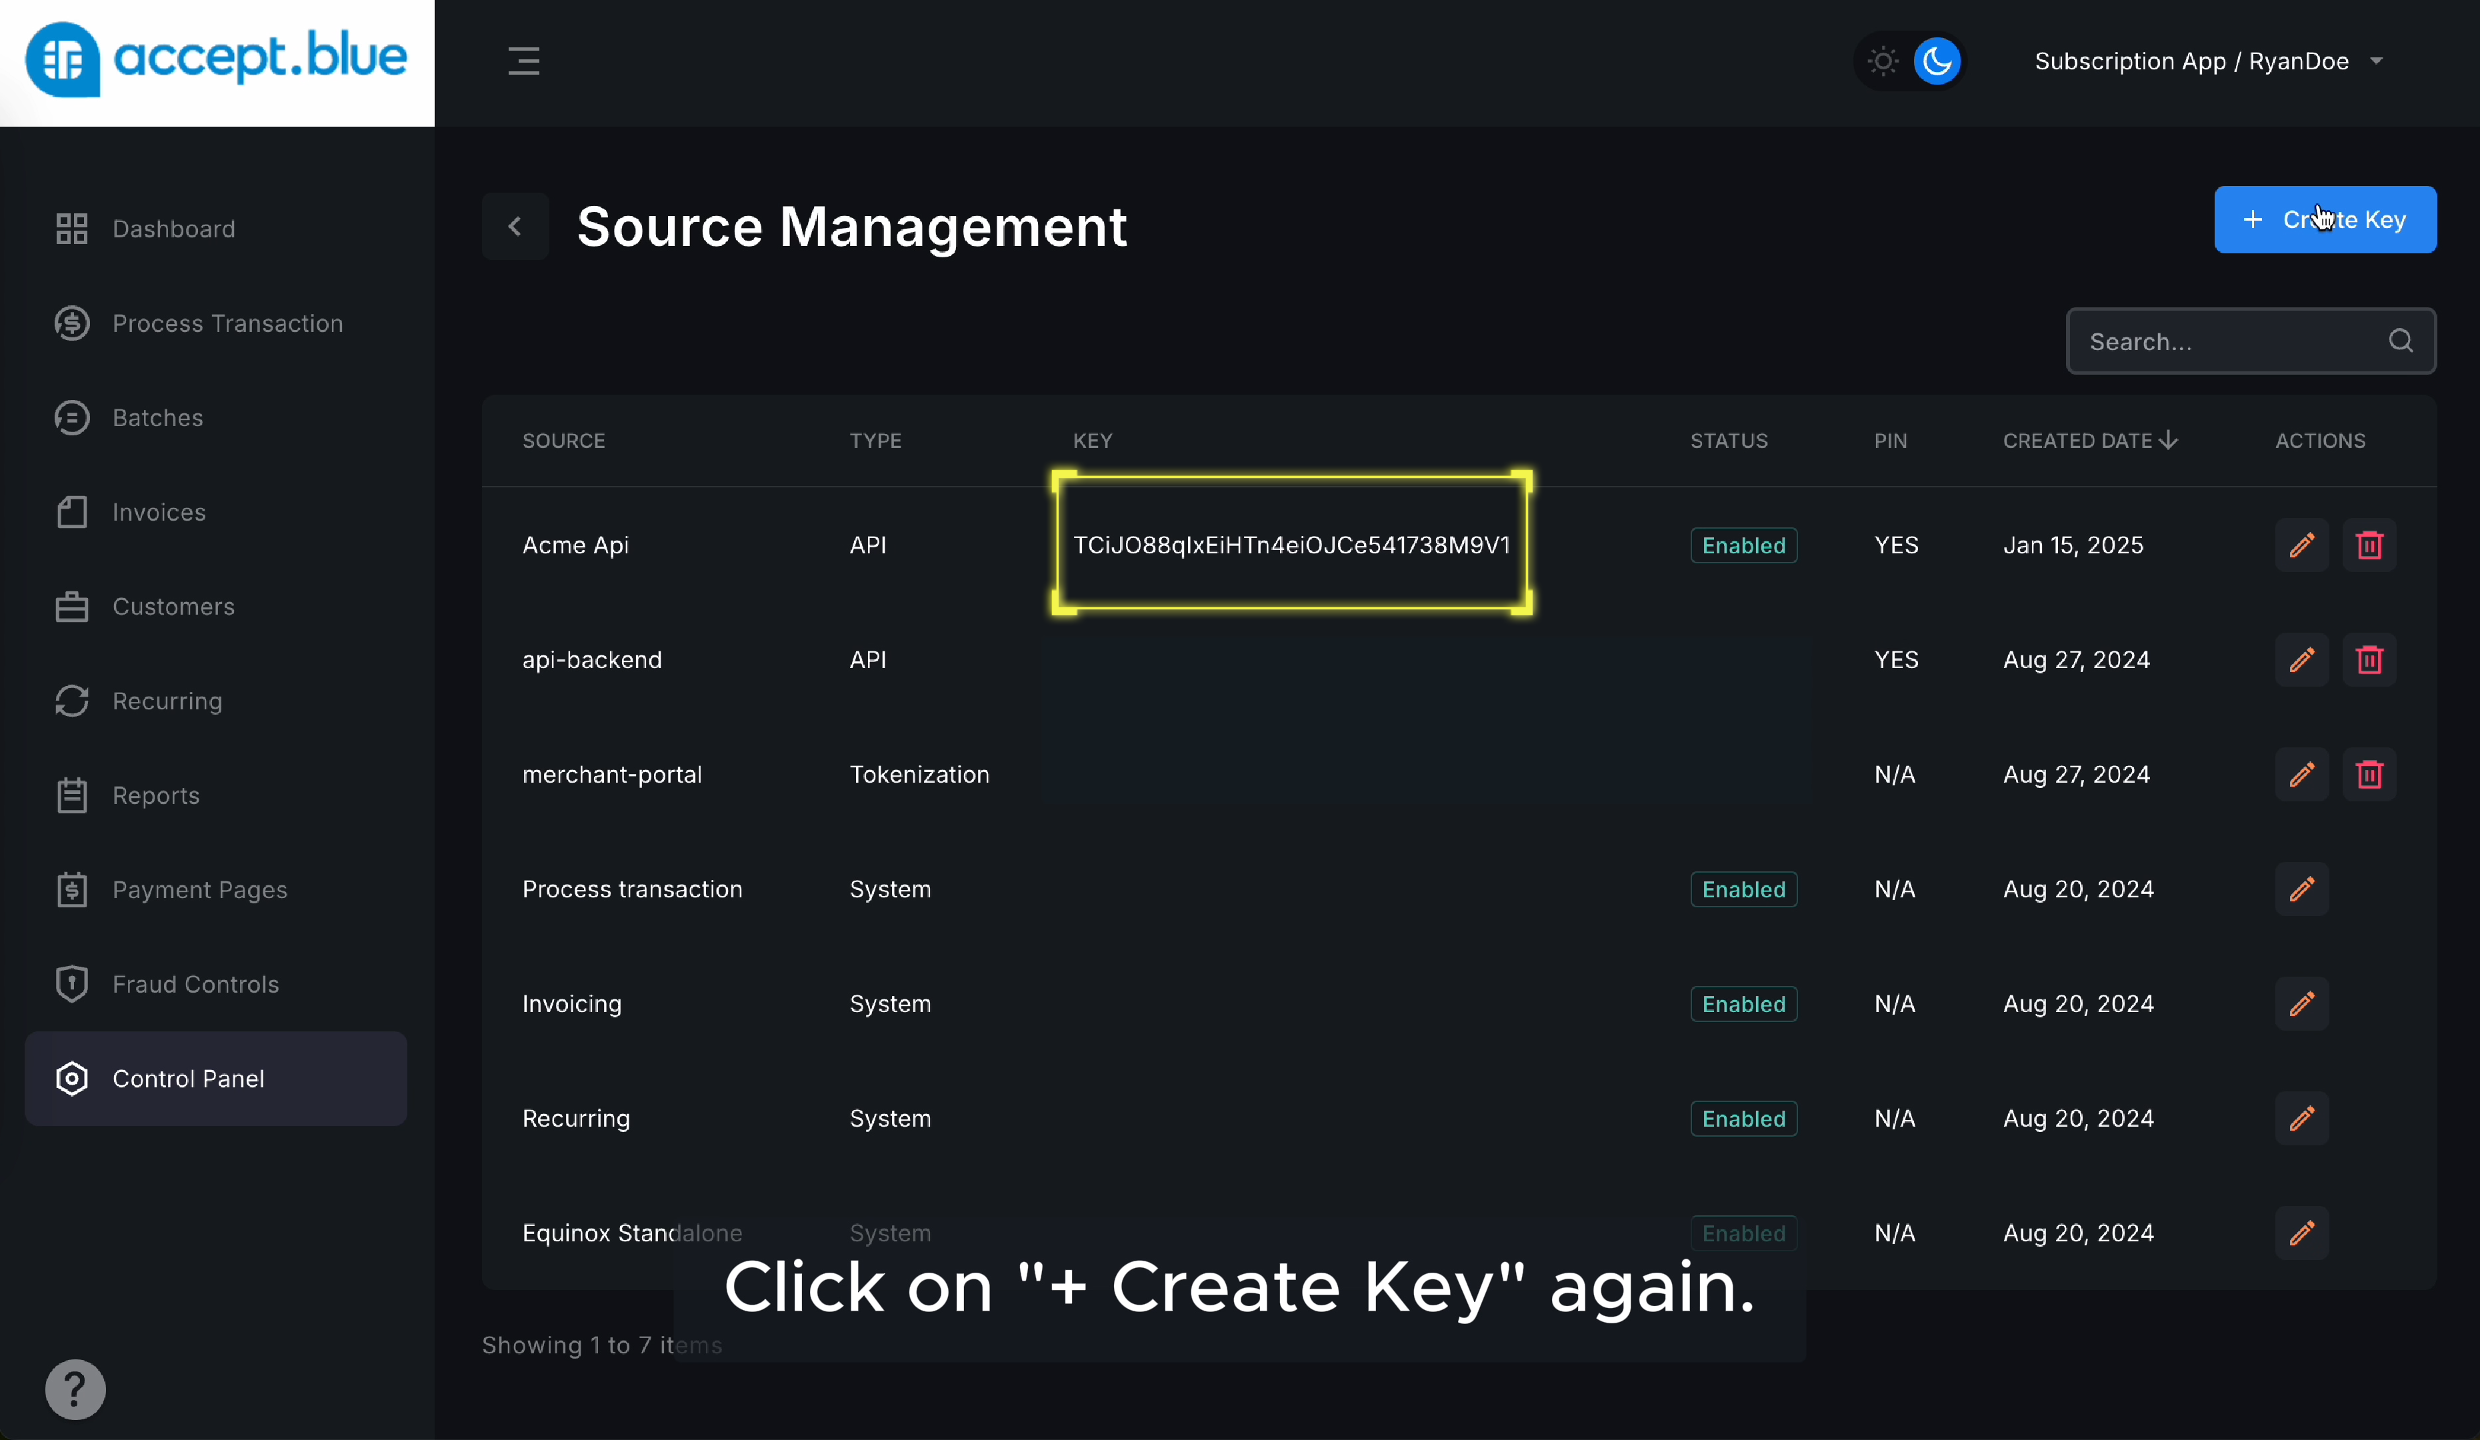
    ## Copy the API Key

    Once the key is generated, copy the API Key generated. 
    <img src="https://mintcdn.com/allset-4aec8bc0/0jKEgzGspG6HGCv3/images/generated-api-key.png?fit=max&auto=format&n=0jKEgzGspG6HGCv3&q=85&s=43a87de99339dfb34c0e9ee51fe66320" alt="Generated Api Key Pn" width="2480" height="1440" data-path="images/generated-api-key.png" />

    ###
  </Step>

  <Step title="Step 10">
    ## Enter Your API Key & PIN in All Set

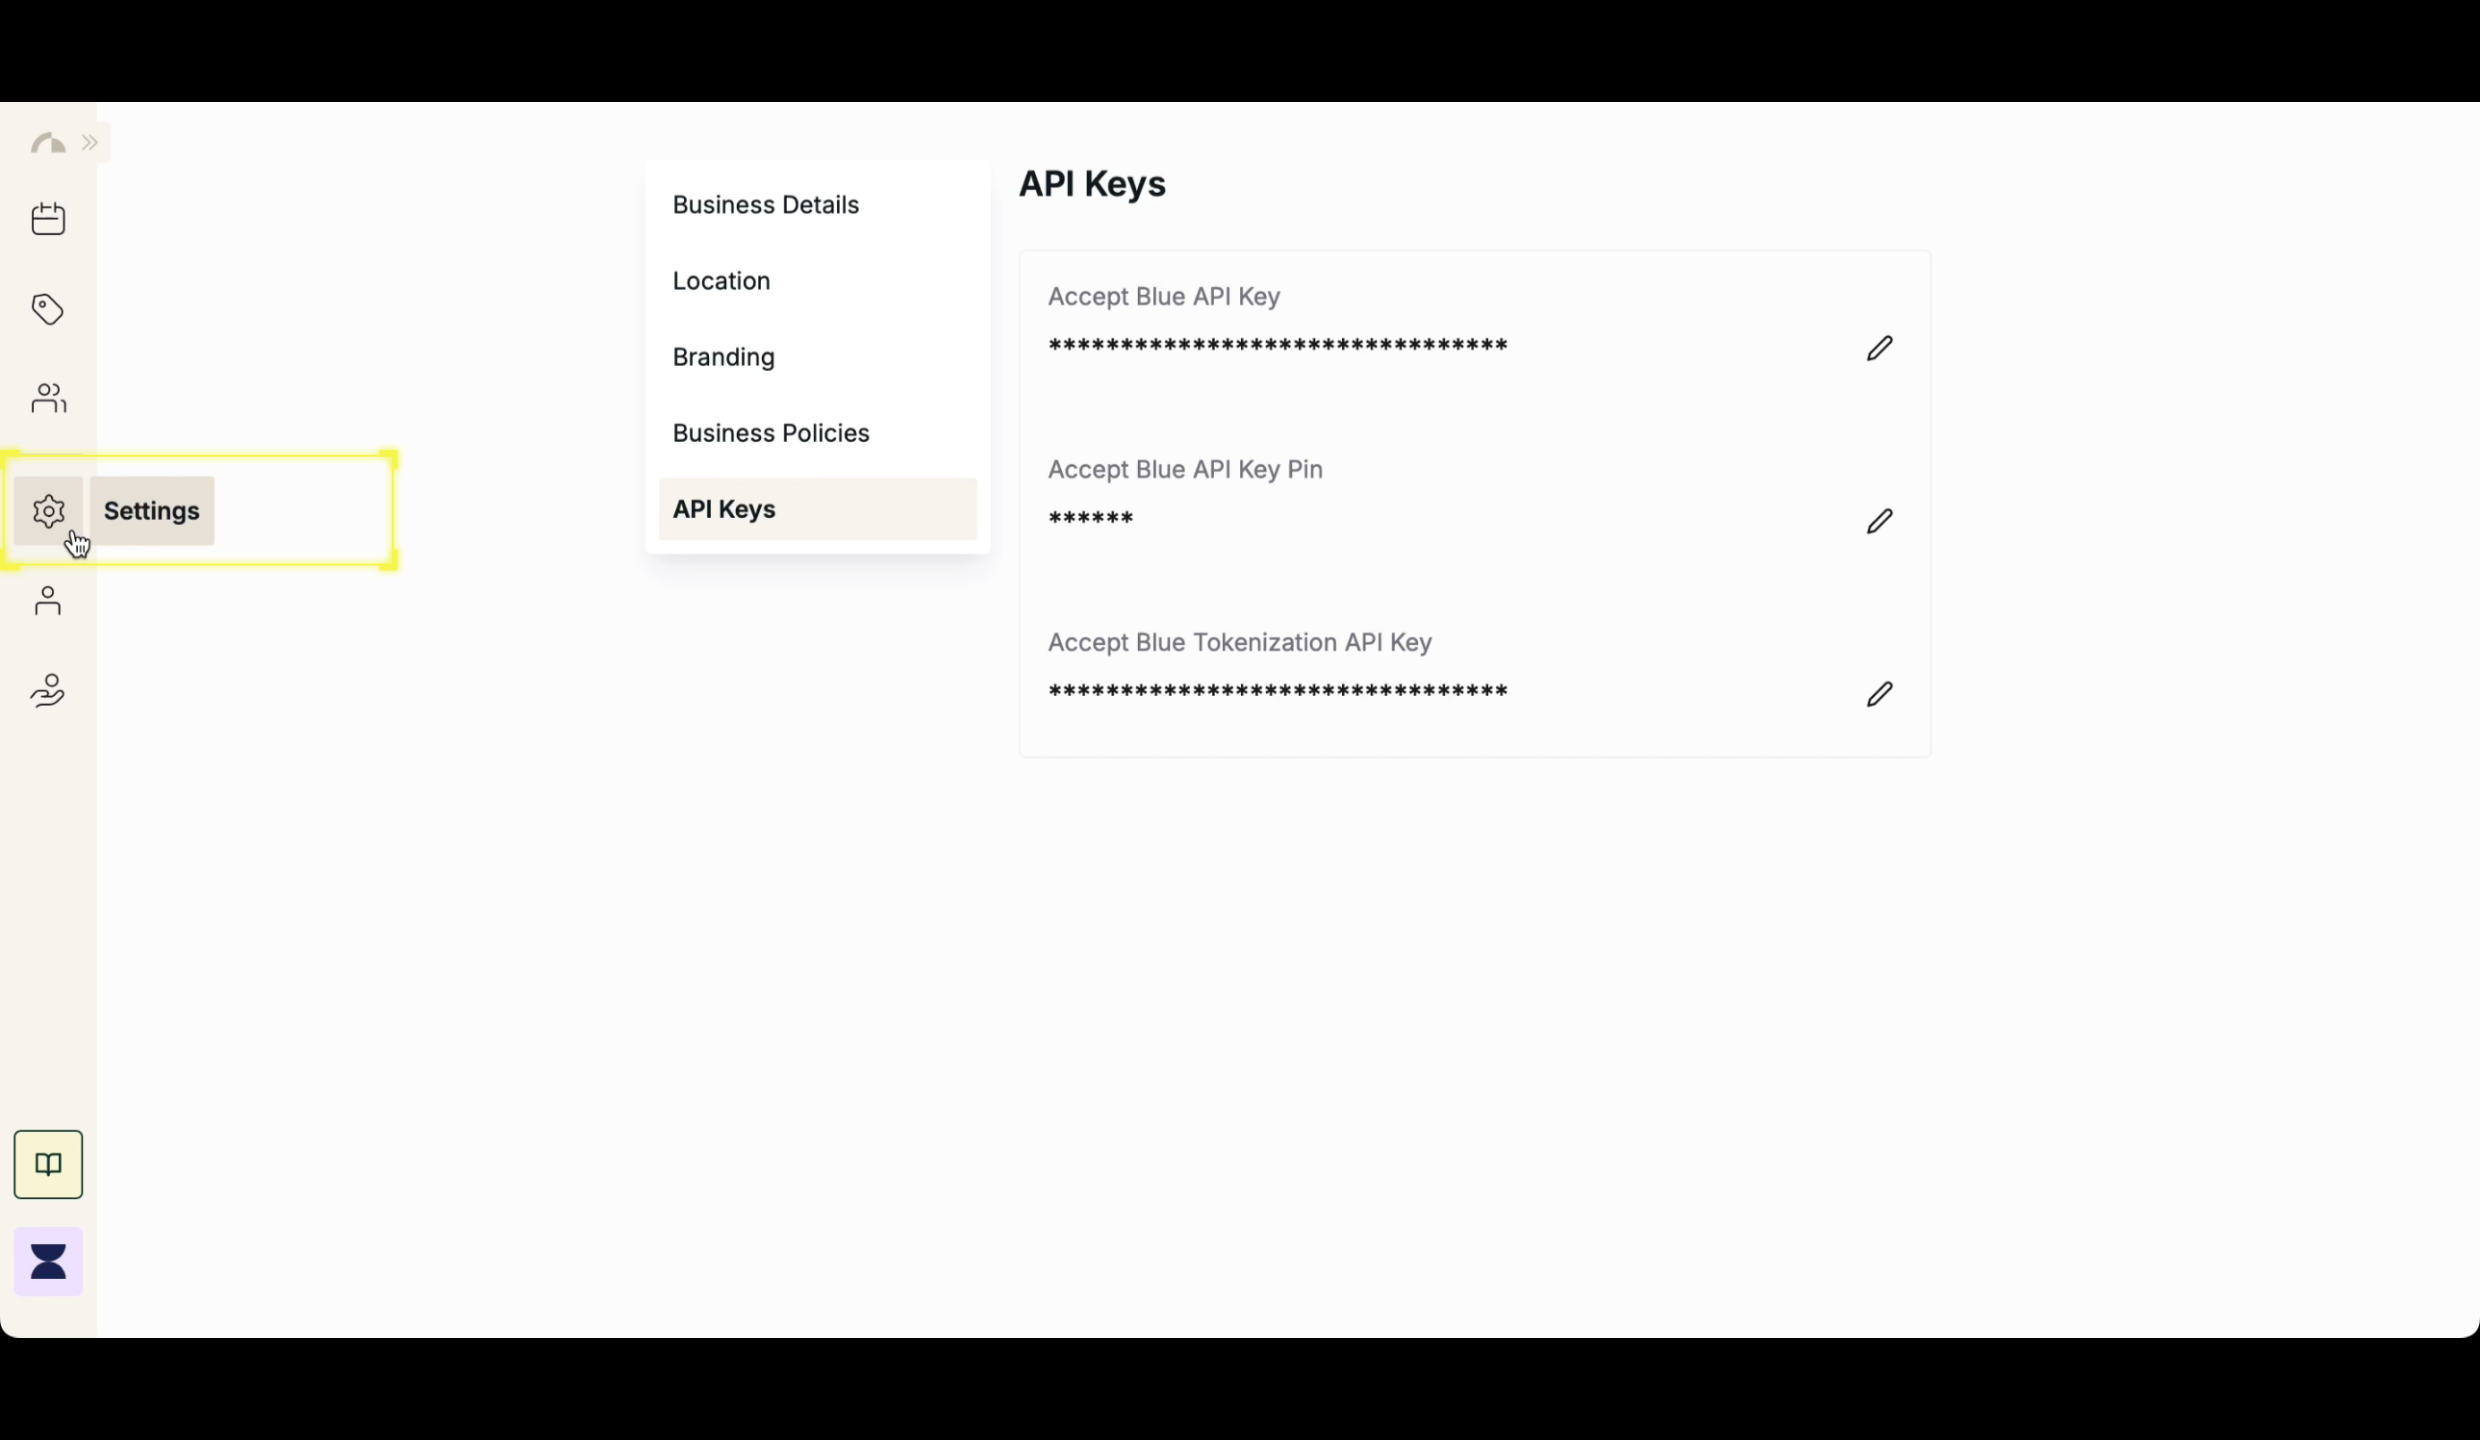
    ### In your All Set dashboard:

    Go to Settings → API Keys
    <img src="https://mintcdn.com/allset-4aec8bc0/fT23JsCqtNJF17Wp/images/settings-api.png?fit=max&auto=format&n=fT23JsCqtNJF17Wp&q=85&s=b6c8ab9c16dd5aee7c59e775906d1ade" alt="Settings Api Pn" width="2480" height="1440" data-path="images/settings-api.png" />

    Enter your API Key, and API Key PIN in the provided fields
    <img src="https://mintcdn.com/allset-4aec8bc0/0jKEgzGspG6HGCv3/images/key-and-pin.png?fit=max&auto=format&n=0jKEgzGspG6HGCv3&q=85&s=faa26d86cf123f3cdedfde68b7add2e0" alt="Key And Pin Pn" width="2480" height="1440" data-path="images/key-and-pin.png" />
  </Step>
</Steps>

## Create a Tokenization Key

<Steps>
  <Step title="Step 1">
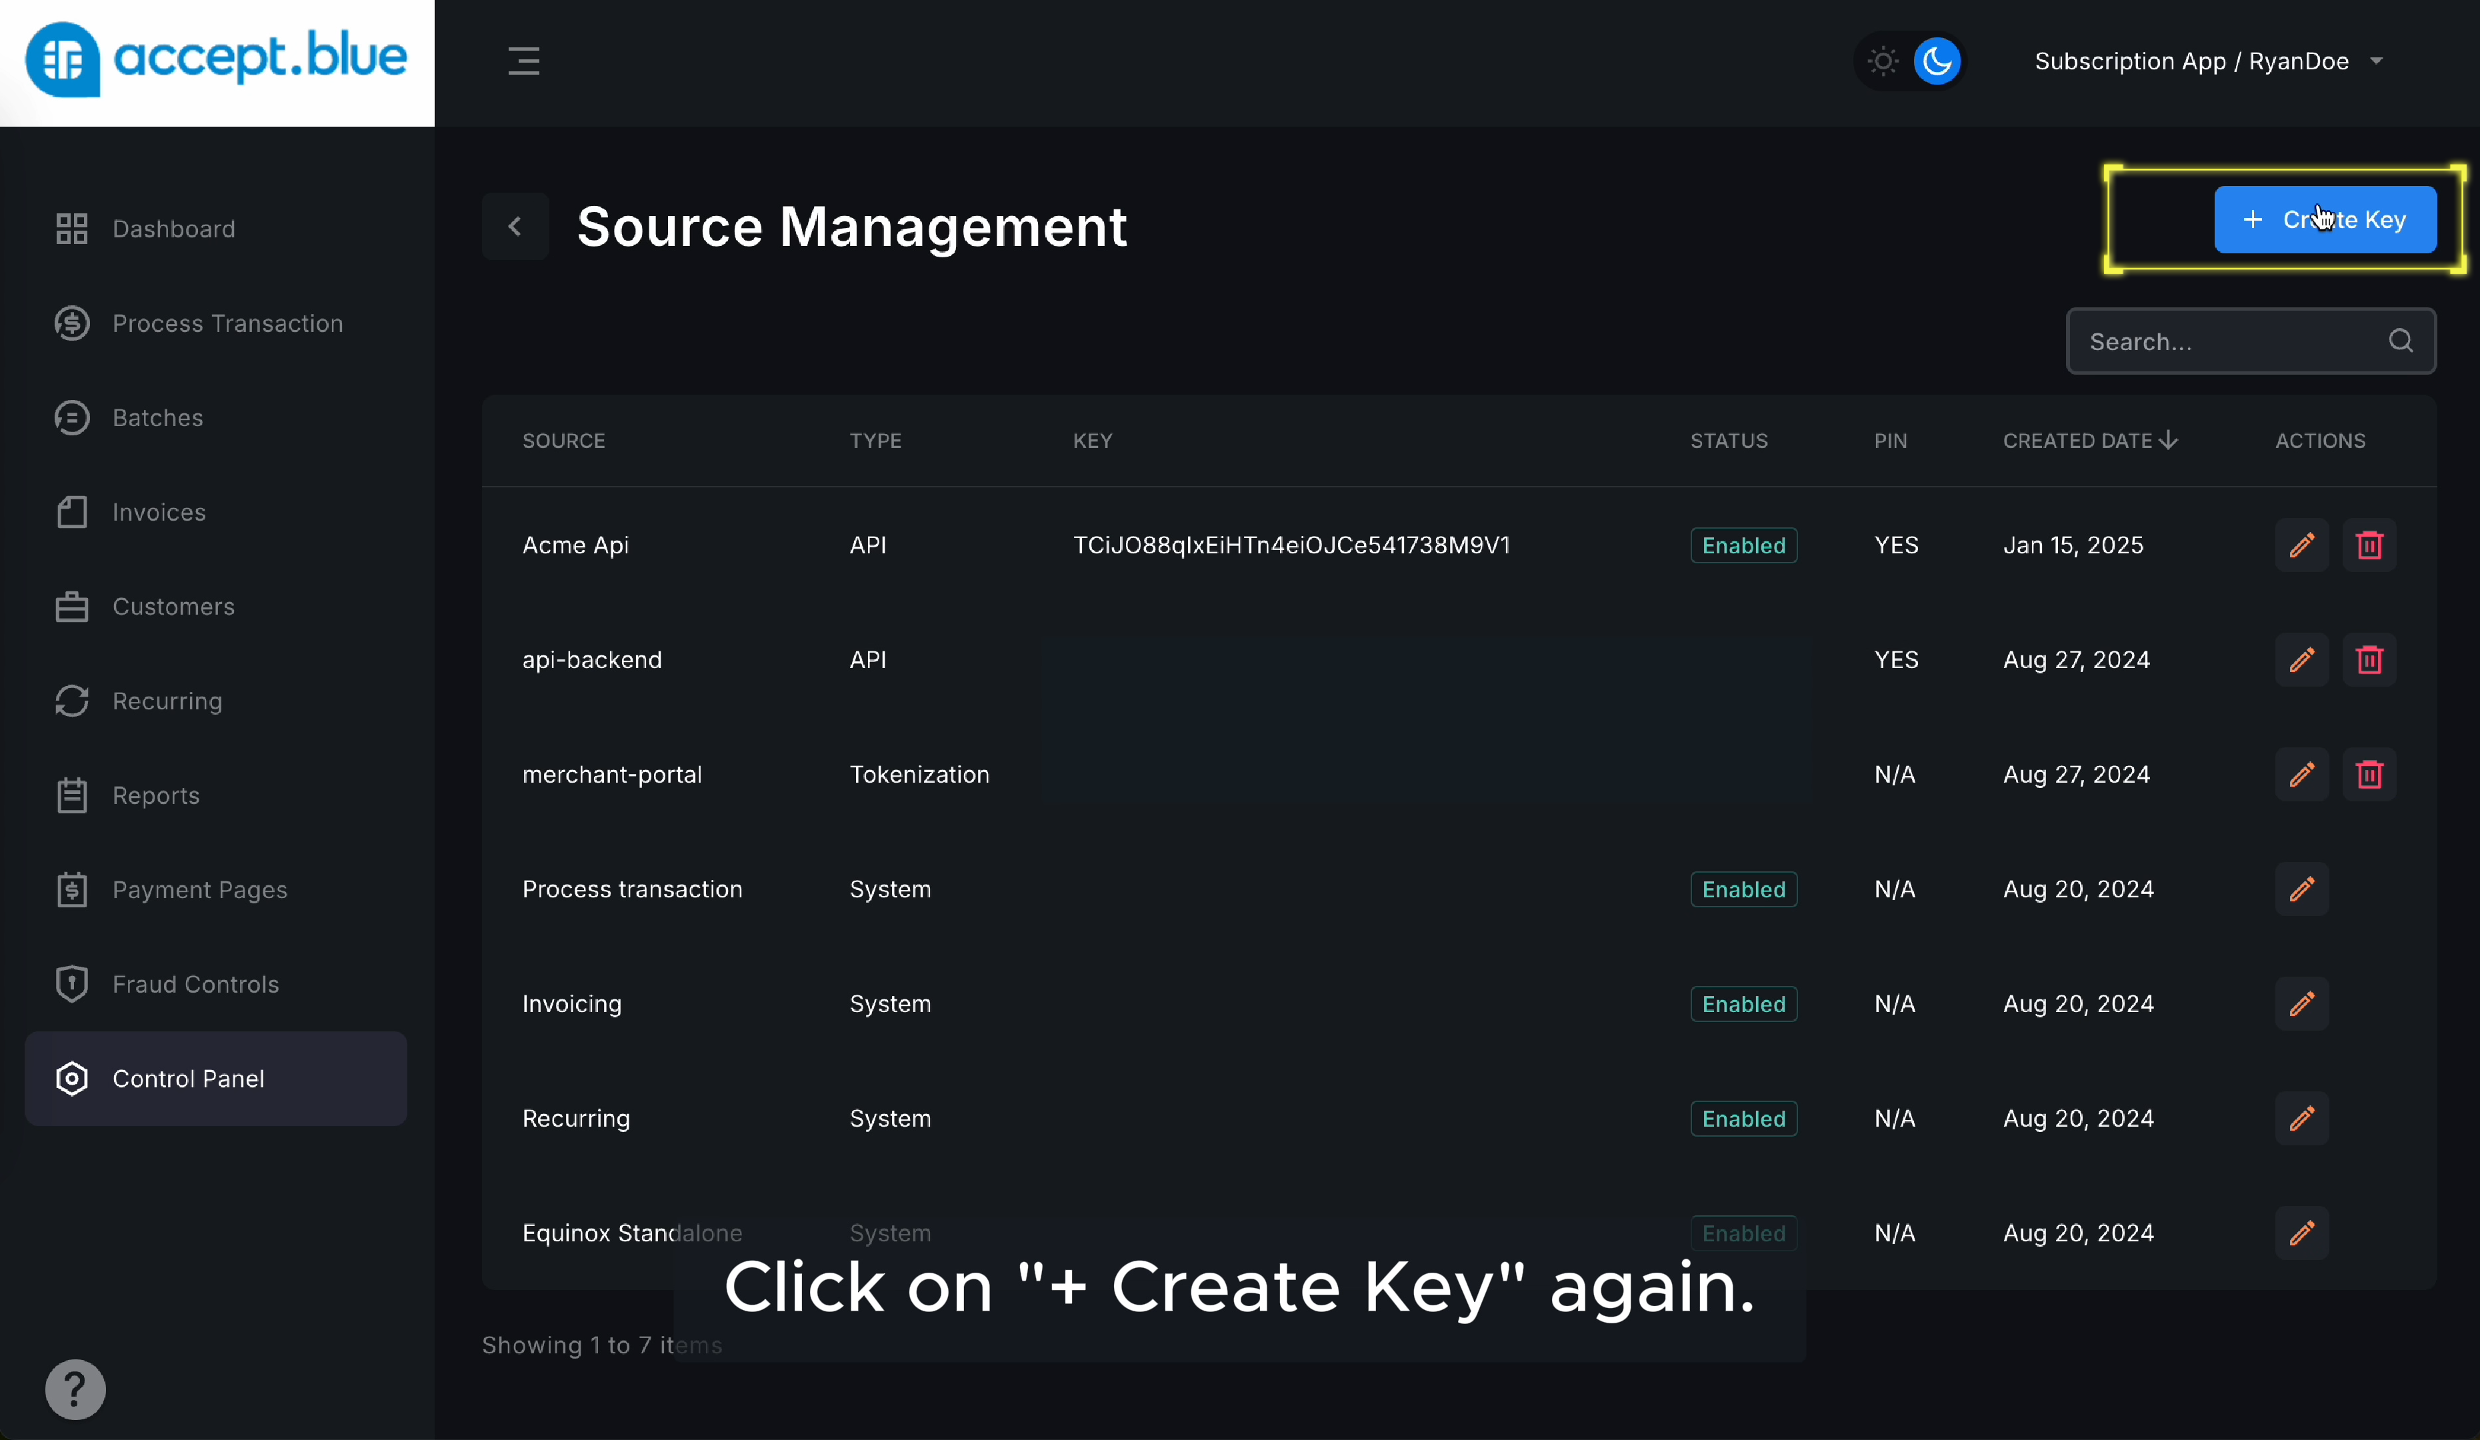
    ## Click “+ Create Key” Again

    Click + Create Key to begin creating a new key.
    <img src="https://mintcdn.com/allset-4aec8bc0/0jKEgzGspG6HGCv3/images/create-key-again.png?fit=max&auto=format&n=0jKEgzGspG6HGCv3&q=85&s=b3c2e08887c30508ee5b99e741f71cef" alt="Create Key Again Pn" width="2480" height="1440" data-path="images/create-key-again.png" />
  </Step>

  <Step title="Step 2">
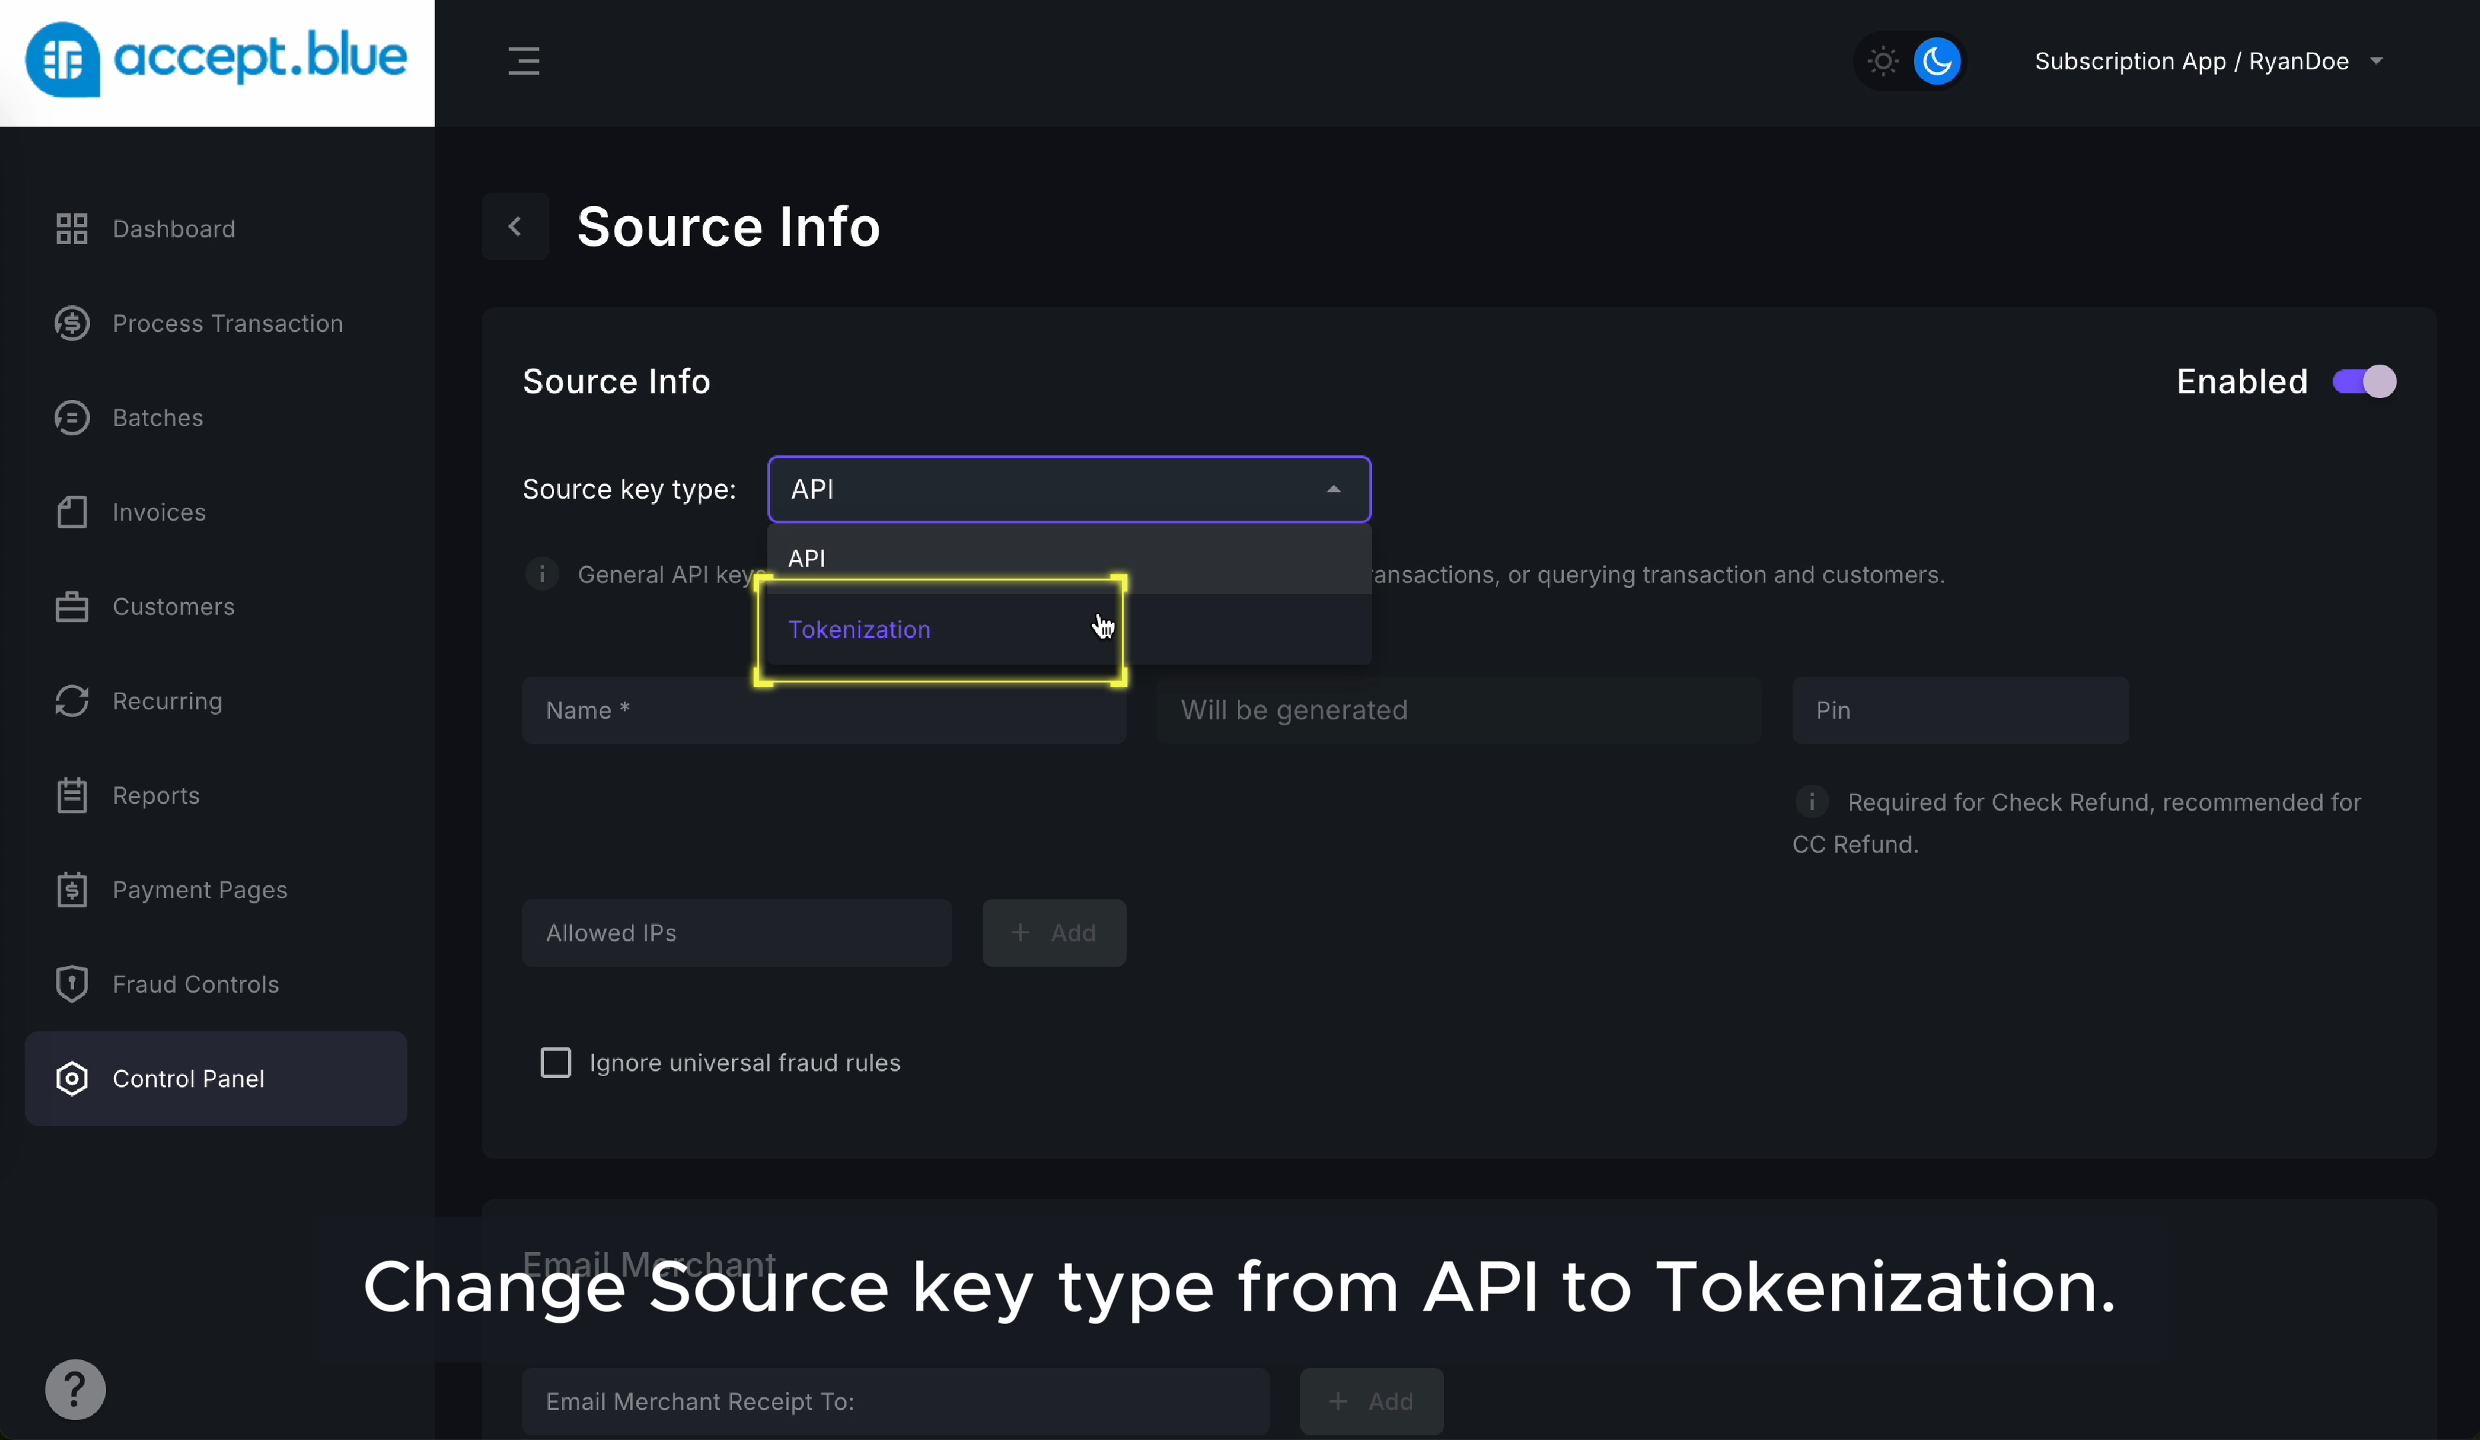
    ## Change the Source Key Type

    From the Source Key Type dropdown, select Tokenization instead of API.
    <img src="https://mintcdn.com/allset-4aec8bc0/fT23JsCqtNJF17Wp/images/tokenization.png?fit=max&auto=format&n=fT23JsCqtNJF17Wp&q=85&s=555026be97def303640e02abb94451b4" alt="Tokenization Pn" width="2480" height="1440" data-path="images/tokenization.png" />
  </Step>

  <Step title="Step 3">
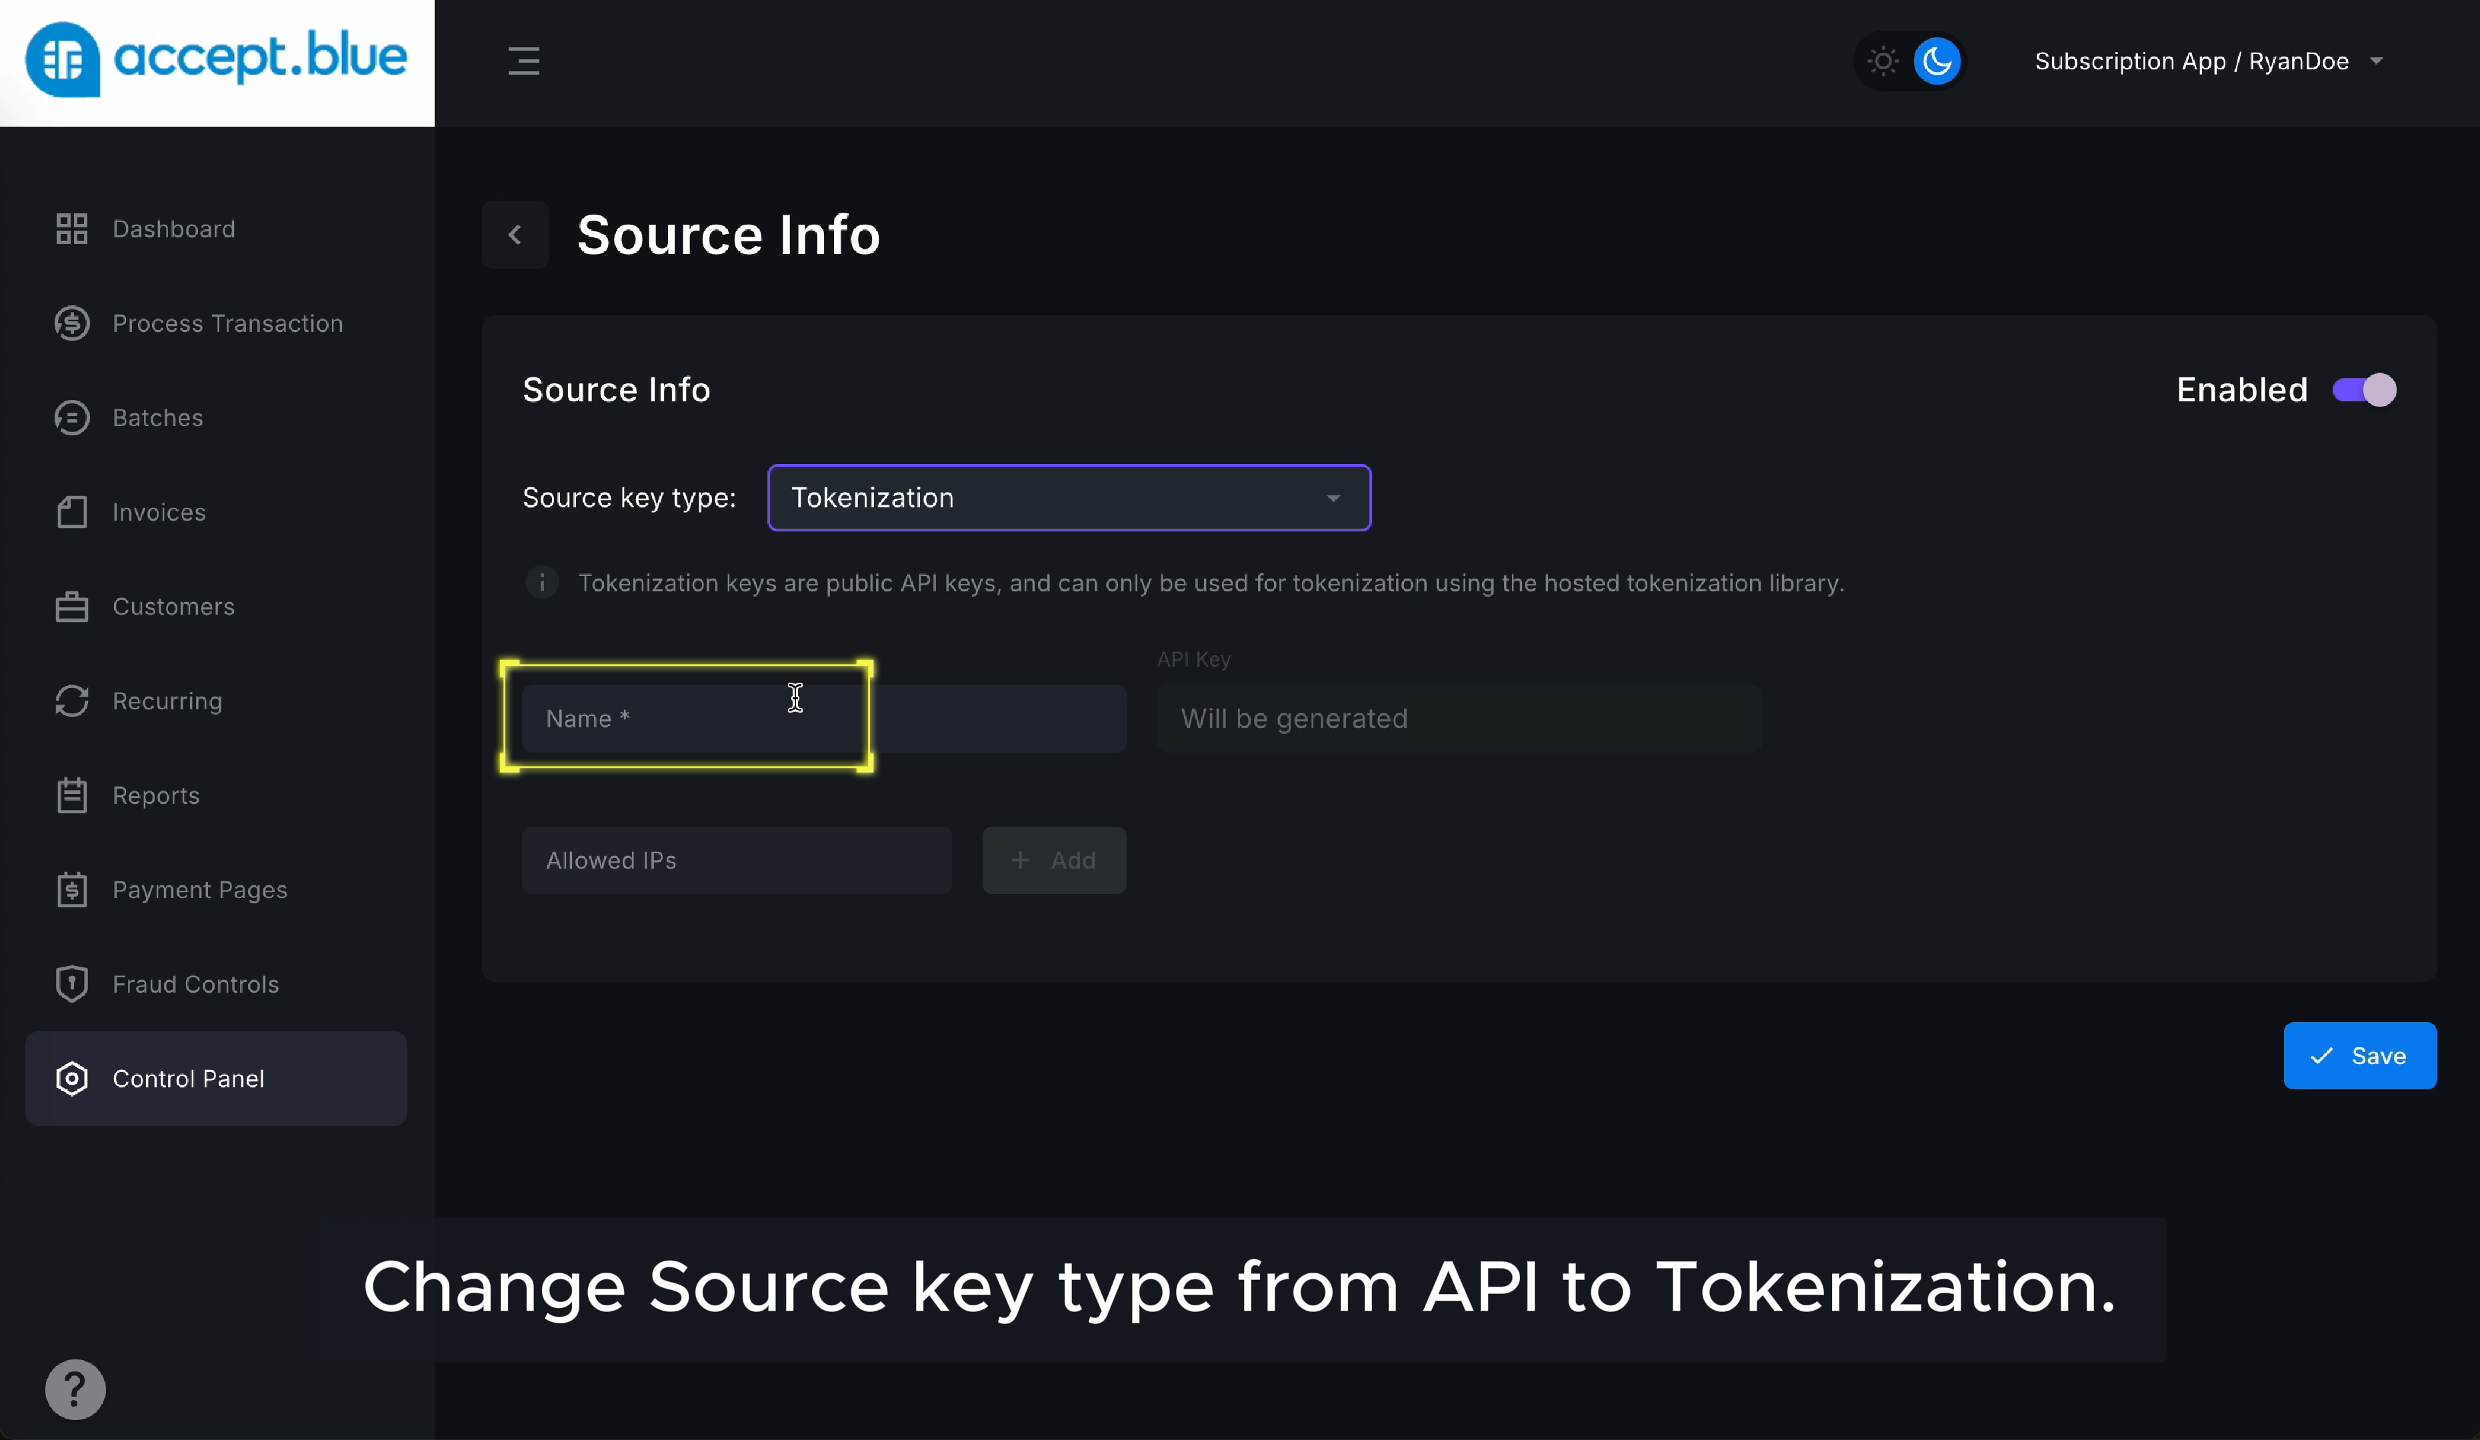
    ## Enter the Merchant’s Name

    Input the merchant name again for this key.
    <img src="https://mintcdn.com/allset-4aec8bc0/fT23JsCqtNJF17Wp/images/token-merchant-name.png?fit=max&auto=format&n=fT23JsCqtNJF17Wp&q=85&s=d2051c7032fbce74e308b0597ddd779b" alt="Token Merchant Name Pn" width="2480" height="1440" data-path="images/token-merchant-name.png" />
  </Step>

  <Step title="Step 4">
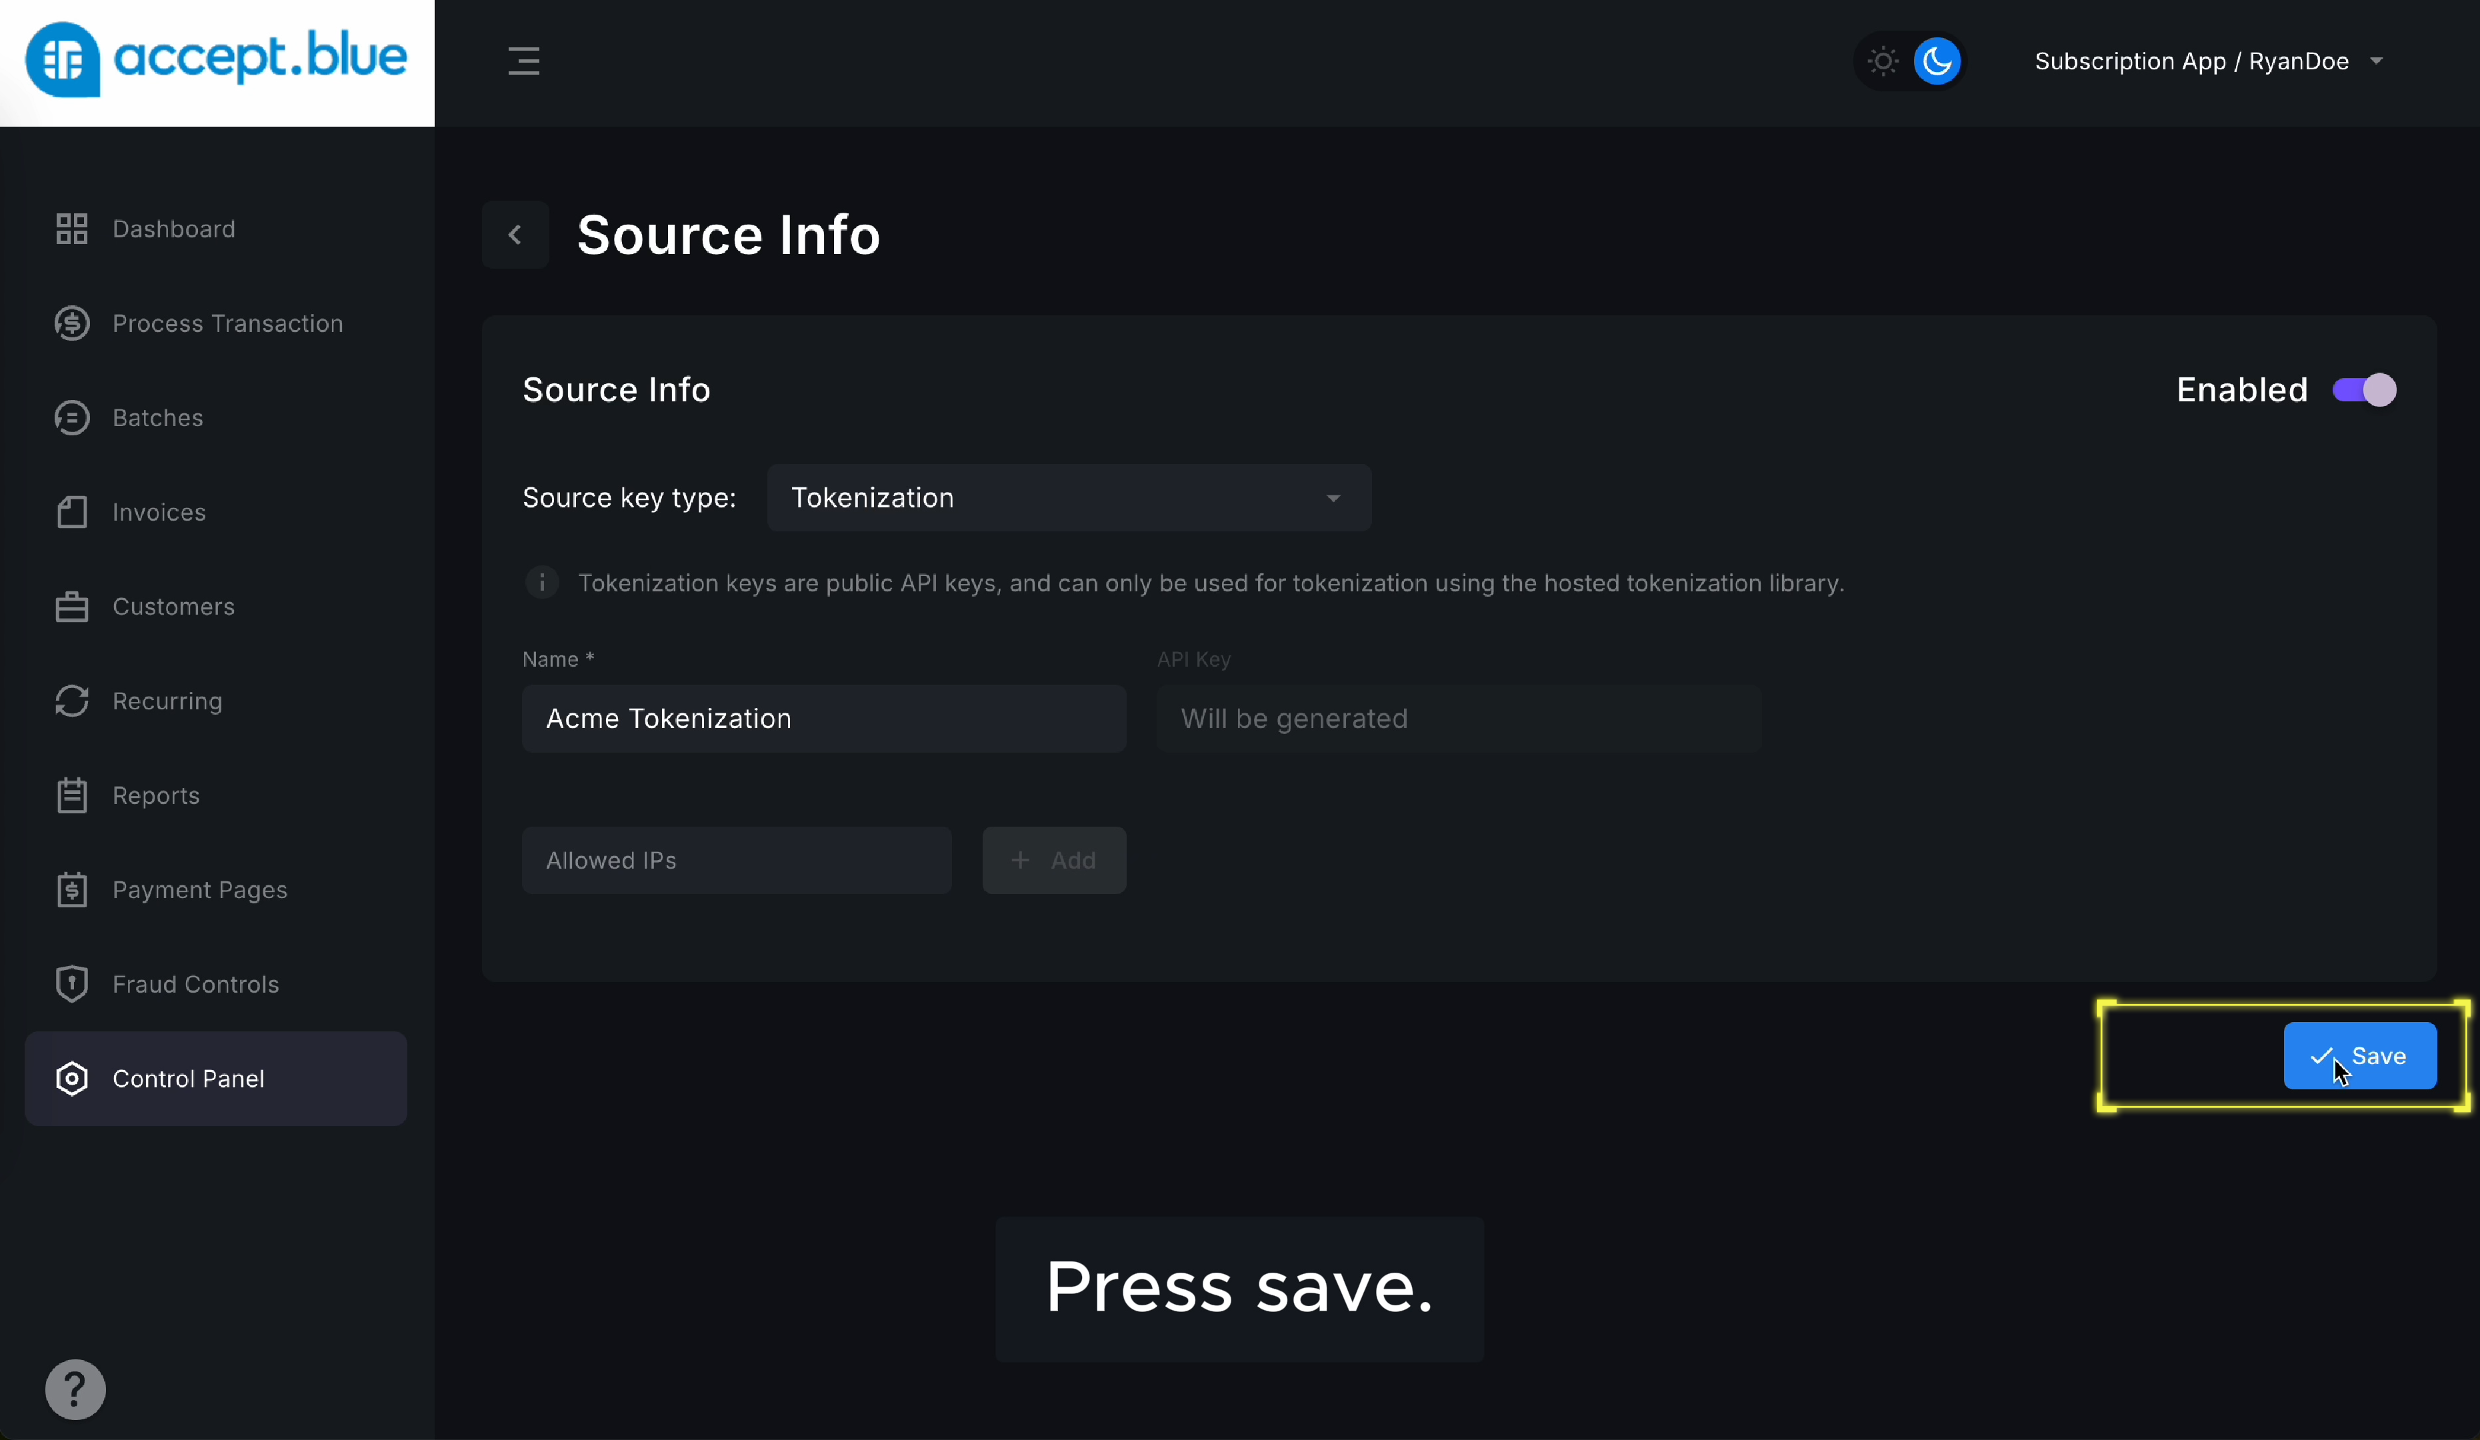
    ## Click Save

    Click Save to complete and generate your tokenization key.
    <img src="https://mintcdn.com/allset-4aec8bc0/fT23JsCqtNJF17Wp/images/save-tokenization.png?fit=max&auto=format&n=fT23JsCqtNJF17Wp&q=85&s=83511a3454e5bc0b509b7b9564d1fa59" alt="Save Tokenization Pn" width="2480" height="1440" data-path="images/save-tokenization.png" />
  </Step>

  <Step title="Step 5">
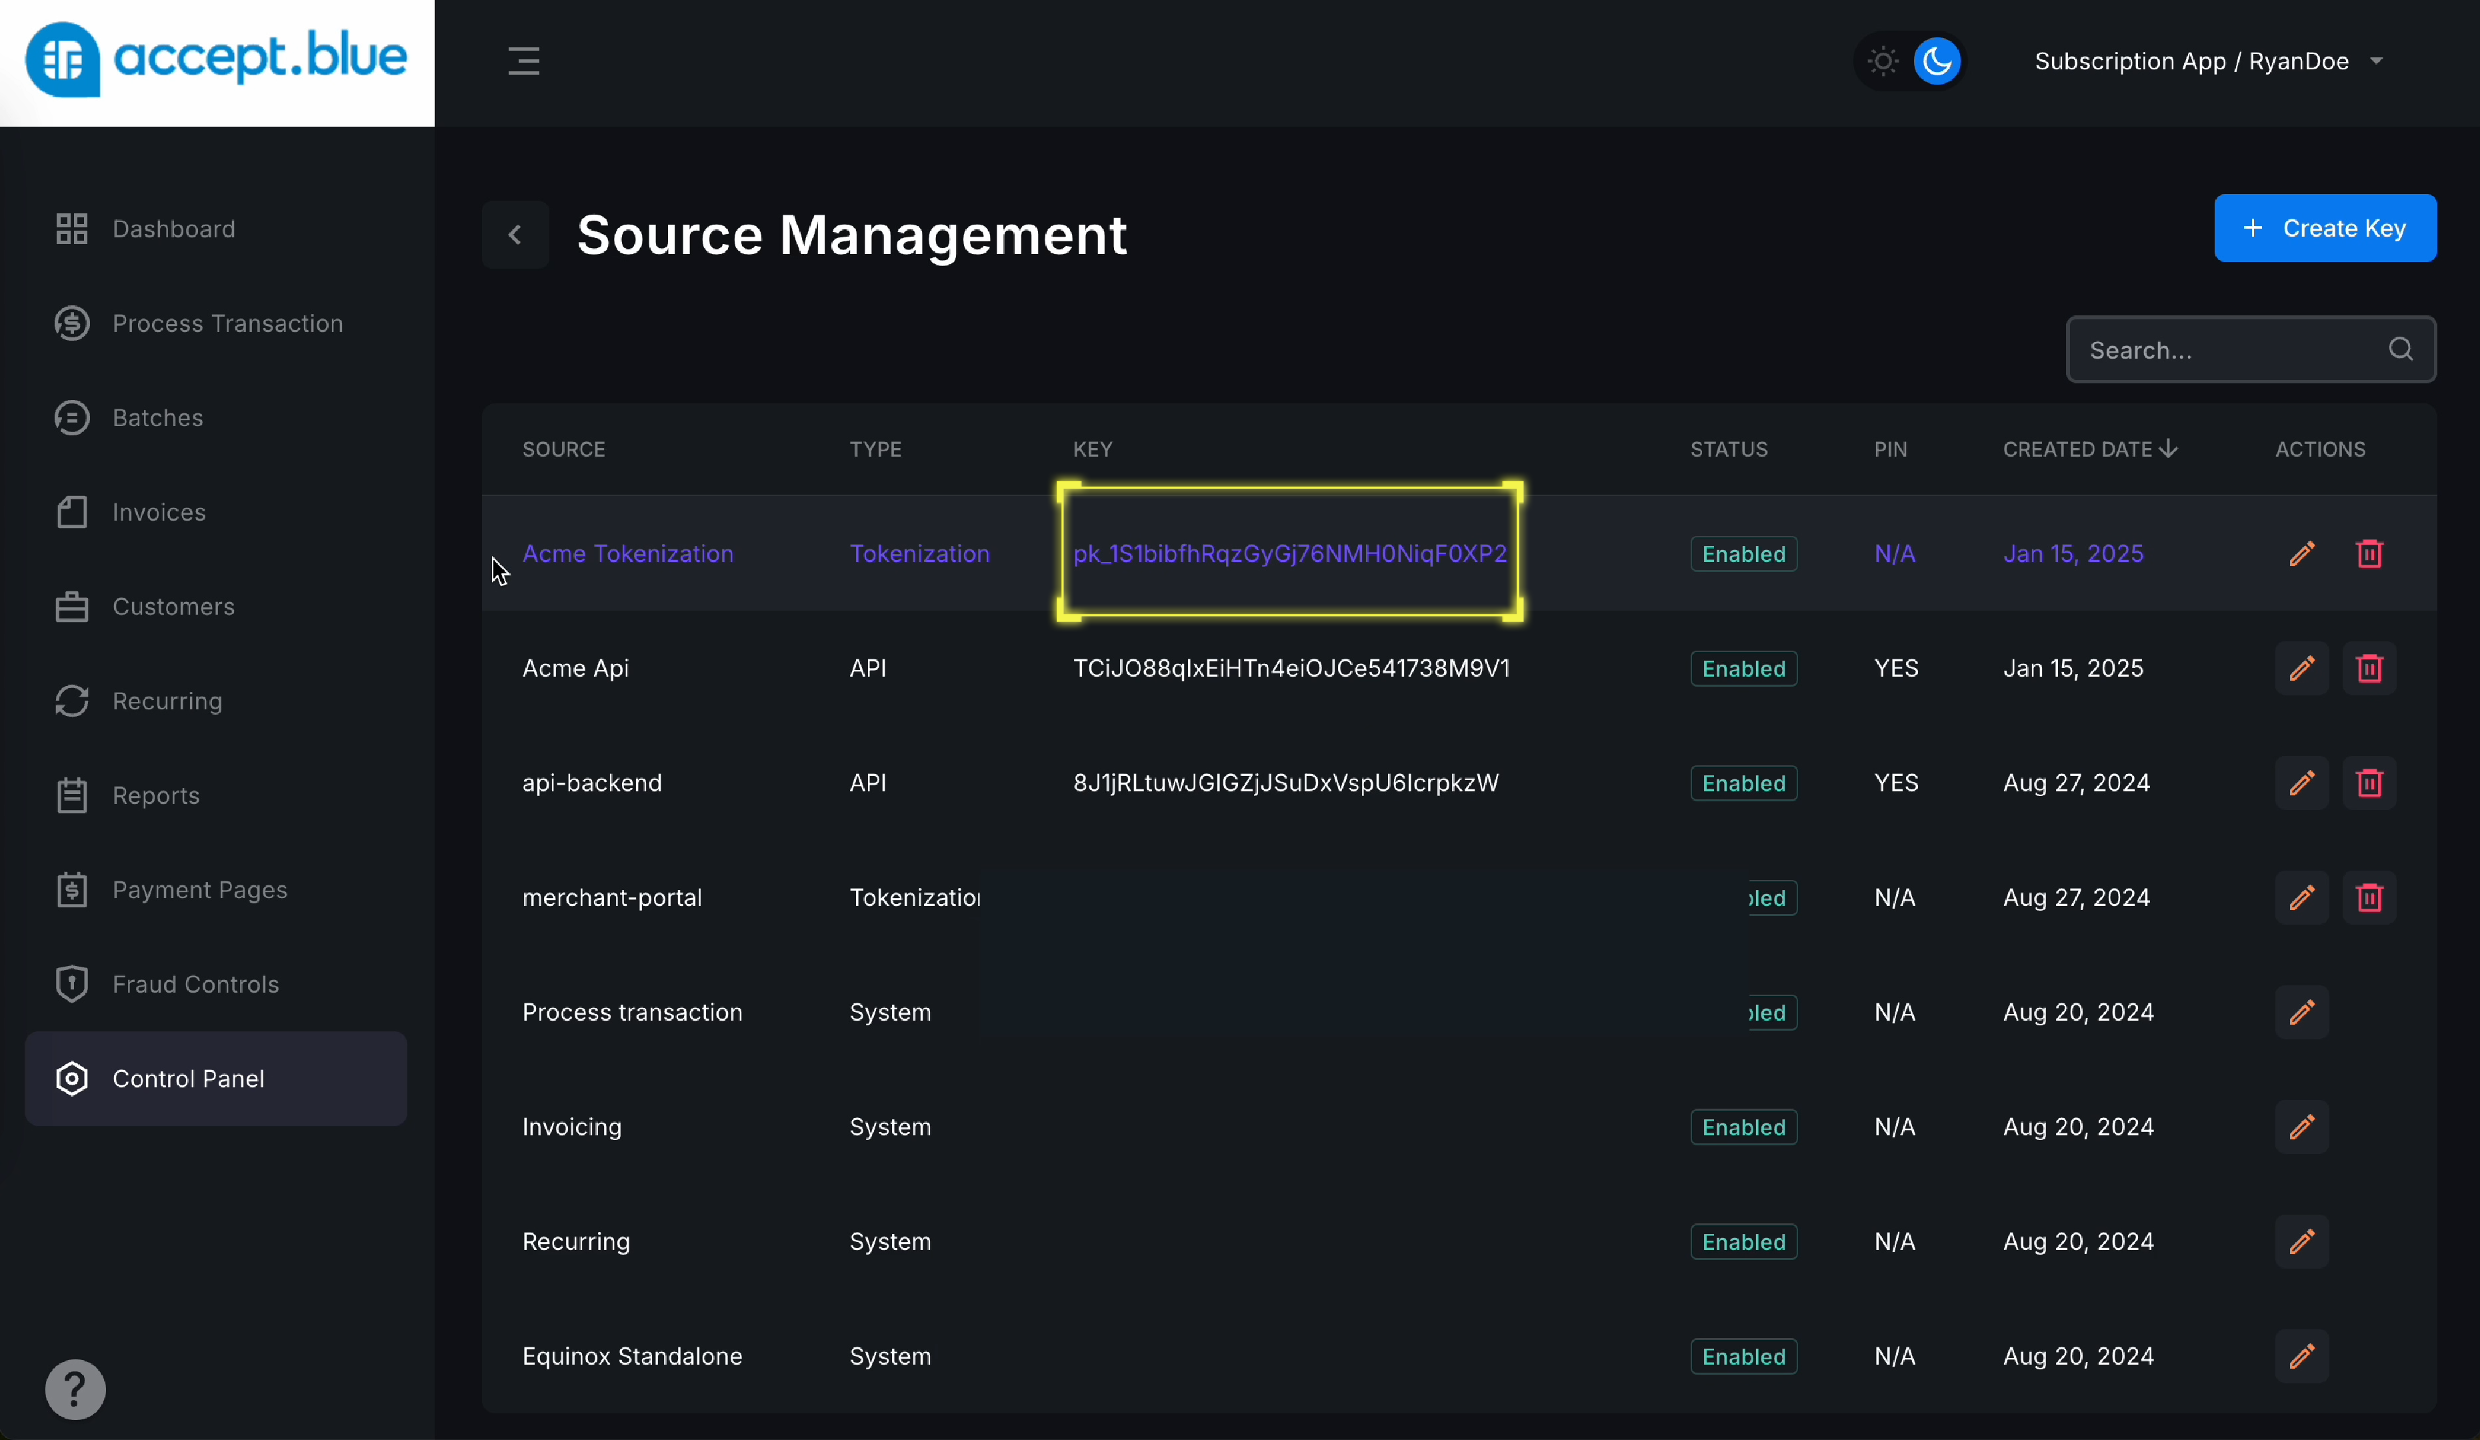
    ## Copy the Tokenization Key

    After saving, copy the Tokenization Key generated.
    <img src="https://mintcdn.com/allset-4aec8bc0/0jKEgzGspG6HGCv3/images/copy-tokenization-key.png?fit=max&auto=format&n=0jKEgzGspG6HGCv3&q=85&s=f4404938da5c27d1834d115f27e4f528" alt="Copy Tokenization Key Pn" width="2480" height="1440" data-path="images/copy-tokenization-key.png" />
  </Step>

  <Step title="Step 6">
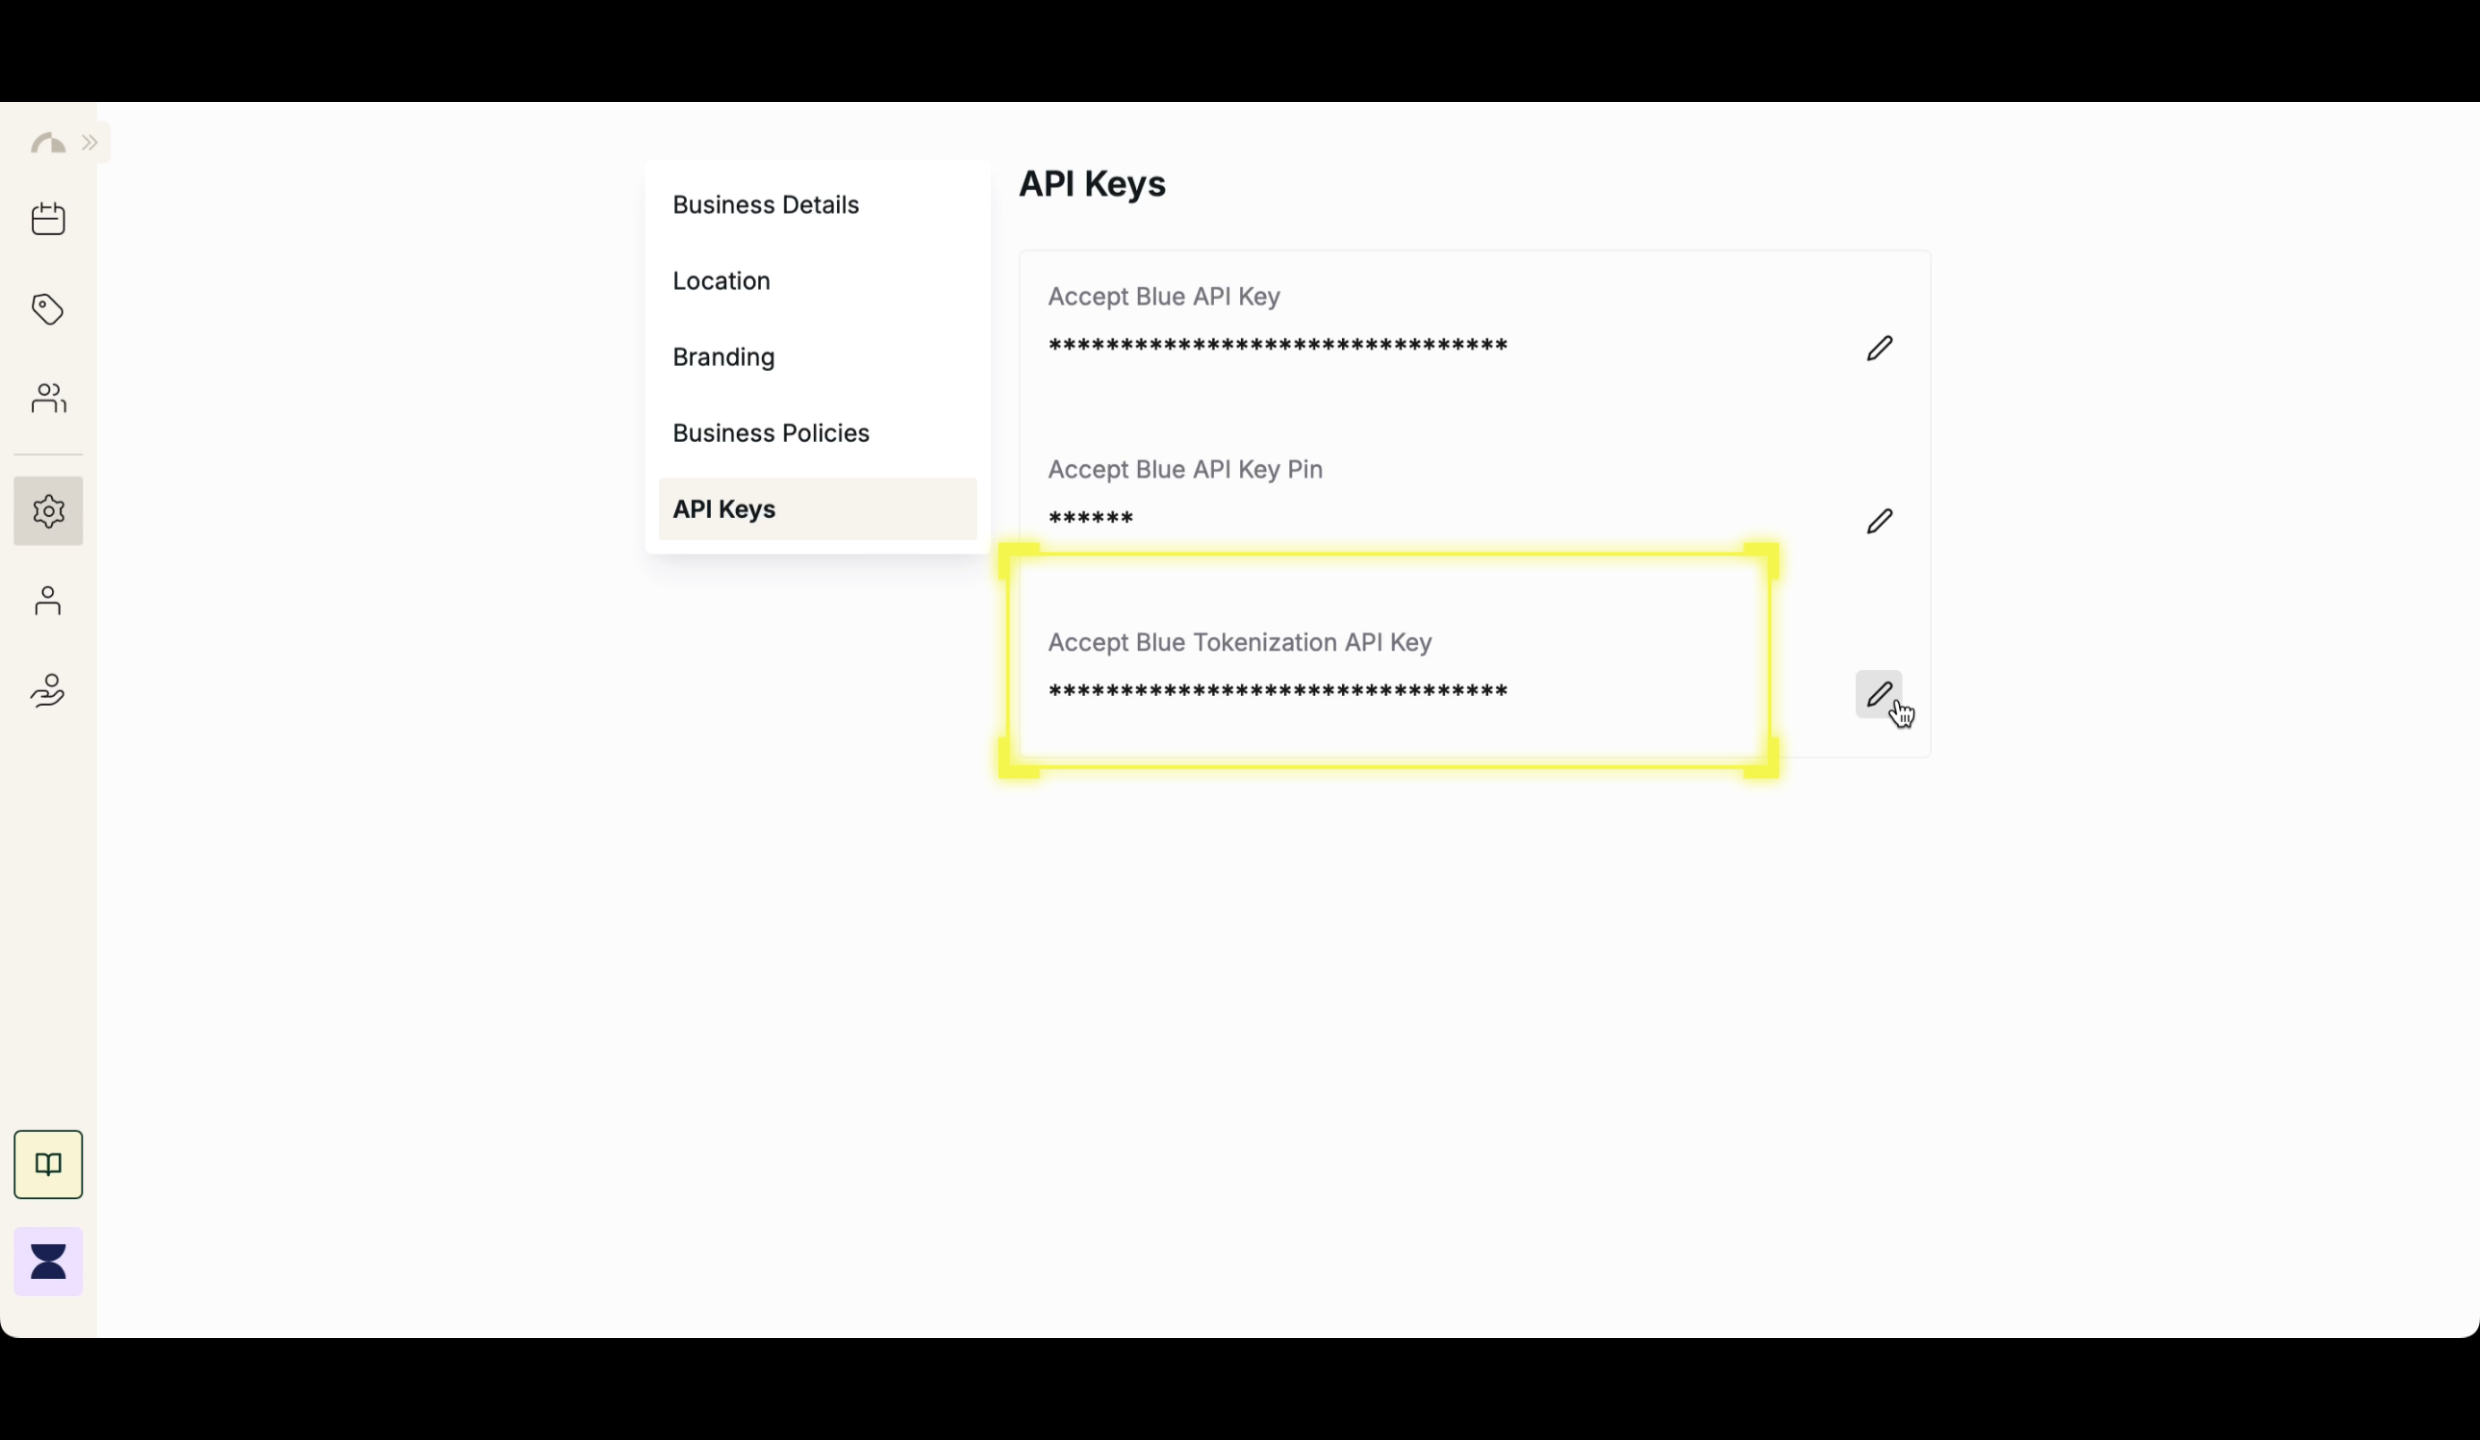
    ## Enter Your Tokenization Key in All Set

    In your All Set dashboard, paste your new Tokenization Key into the Accept Blue Tokenization Key field.
    <img src="https://mintcdn.com/allset-4aec8bc0/fT23JsCqtNJF17Wp/images/tokenization-key.png?fit=max&auto=format&n=fT23JsCqtNJF17Wp&q=85&s=d804b634ac09ddfd489e3b10c182a501" alt="Tokenization Key Pn" width="2480" height="1440" data-path="images/tokenization-key.png" />
  </Step>
</Steps>
